

1. Objective
The objective of this lab is to learn how to deploy Palo Alto Networks (aka PAN) VM-series firewalls in the Transit VNet and inspect traffic between the two Spoke VNets using firewall policies.
2. FireNet (Firewall Network) Overview
Aviatrix Firewall Network (aka FireNet) is a turnkey solution to deploy and manage firewall instances in the cloud, as shown in the topology below. Firewall Network significantly simplifies virtual firewall deployment and allows the firewall to inspect VPC/VNet/VCN to VPC/VNet/VCN (East West) traffic, VPC/VNet/VCN to Internet (Egress) traffic, and VPC/VNet/VCN to on-prem including partners and branches (North South) traffic.
In addition, Firewall Network allows you to scale firewall deployment to multi AZ and multi instances/VMs in maximum throughput active/active state without the SNAT requirement.
3. Topology
Up until now, in Azure you have only worked on azure-us-west-spoke1. This lab will introduce finally azure-us-west-spoke2, which is a gateway in the top-right corner of this topology that is already deployed (hence it is red); there is the attachment that has not been deployed yet!
4. Configuration
4.1. Azure Transit to Spoke Peering
First, you will need to configure the grey Aviatrix Spoke-Transit connection in the topology between azure-us-west-spoke2 and azure-us-west-transit.
Go to CoPilot > Cloud Fabric > Gateways > Spoke Gateways and edit the Spoke Gateway azure-us-west-spoke2, clicking on the pencil icon:

Attach azure-us-west-spoke2 (pre-configured VNet) to azure-us-west-transit as shown below:

Note that azure-us-west-transit is already enabled for FireNet function.
4.2. PAN Firewall Deployment
In this step you will be deploying a PAN firewall from the Aviatrix Controller with a Bootstrap package.
The bootstrap package will take care of the following pre-provisioning on the Firewall:
- Interfaces mapping
- Policies creation
- Logging
- RFC1918 Static Route creation
Specifically, you will be deploying a firewall image called Palo Alto Networks VM-Series Next-Generation Firewall Bundle 1.
Aviatrix has already taken care of the subscription from the Azure Marketplace.
Go to Controller > FIREWALL NETWORK > Setup > Firewall tab.

Deploy a Firewall by entering these settings under (Step 2a) Launch & Associate Firewall Instance:
VPC ID: azure-us-west-transit
Gateway Name: azure-us-west-transit
Firewall Instance Name: azure-us-west-pan
Firewall Image (pay close attention to which item you select): Palo Alto Networks VM-Series Next-Generation Firewall Bundle 1
Firewall Image Version: 9.1.0
Firewall Instance Size: Standard_D3-v2
Management Interface Subnet: azure-us-west-transit-Public-gateway-and-firewall-mgmt-1. [Note: Make sure you do not select the subnets that begin with az-1, az-2, or az-3]
Egress Interface Subnet: azure-us-west-transit-Public-FW-ingress-egress-1 [Note: Make sure you do not select the subnets that begin with az-1, az-2, or az-3]
Username: avxadmin [Note: username admin is not permitted in Azure]
Authentication Method: Password
Password: <choose a strong password and remember it>
Attach: YES
Advanced: Check
Bootstrap Storage Name: Retrieve this from your pod info
Storage Access Key: Retrieve this from your pod info
File-Share Folder: Retrieve this from your pod info
Click LAUNCH:

Note: Please be patient - firewall deployment can take a long time, up to 20 minutes, due to the slow responsiveness of Azure API calls to prepare the firewall. Even after the firewall is created and is assigned a Public IP address, it doesn't mean it can be accessed immediately. If you try accessing it too early, your experience may vary.
At this time, the interface mapping, security policy configuration, and RFC1918 static route creation are all being handled.
You will know the Firewall is created when you see a confirmation message in the Notifications tray like this:

Even after that message, it doesn't mean you can access the firewall. Within 5-10 minutes after you receive confirmation about the firewall being created, you should be able to access it.
Go to CONTROLLER > FIREWALL NETWORK > List > Firewall tab.

Click on the hyperlink for the firewall.

4.3. Firewall Configuration
Once you access the firewall in your web browser via HTTPS, you might get a warning about an invalid certification based on your browser settings. This is just because it has a self-signed certificate. Navigate past that to get to the login prompt. Sign in as avxadmin as the username and the password you entered earlier.

Dismiss the Welcome splash screen. This is an indication that the firewall is ready.
Do not end the firewall's HTTPS session yet. You will return to this web interface later.
4.4. Firewall Vendor Integration
Go to Controller > FIREWALL NETWORK > Vendor Integration > Firewall

Transit VPC ID: azure-us-west-transit
Firewall Instance ID: azure-us-west-pan
Firewall Name: azure-us-west-pan
Firewall Vendor Type: Palo Alto Networks VM-Series
Firewall Login Username: avxadmin
Firewall Login Password: <the password you entered earlier>
Firewall Management IP Address: Auto populated
Then click SAVE. This may take a few seconds.

Then click SHOW to see the RFC 1918 routes that the Controller automatically programmed on the Firewall. Notice how each RFC1918 route has a prefix of AVX- to show that it is programmed by Aviatrix.

4.5. Verify Routes Installed on Firewall
Verify the same RFC 1918 routes exist on the PAN Firewall.
Back on the PAN Firewall, navigate to Network tab > Virtual Routers > click on default.

Click on Static Routes tab. You should be able to see the same RFC 1918 routes with AVX- prefixes that were programmed by the Aviatrix Controller.

Do not end the firewall's HTTPS session yet. You will return to this web interface later.
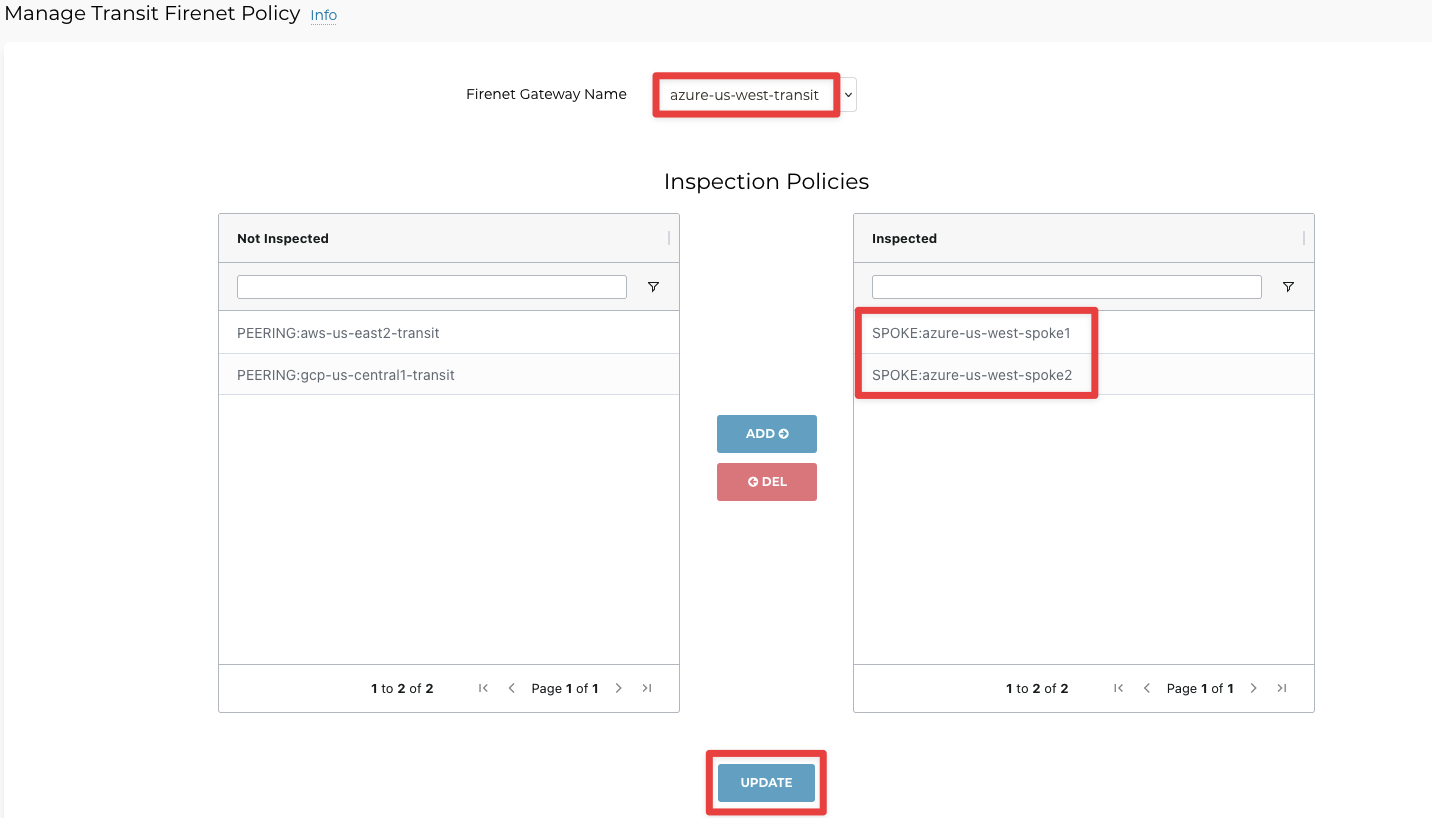
4.6. FireNet Policy
Go to Controller > FIREWALL NETWORK > Policy > Manage Transit FireNet Policy
Select and add each Azure spoke gateway one by one to Inspected box:

Both spoke gateways will show up on the right side under Inspected. Do not forget to click on the UPDATE button.
5. Verification
Verify the traffic flows within Azure and Azure to GCP as shown below by following steps 5.1 - 5.2:
5.1. Within Azure
Before we can verify connectivity, we need to associate azure-us-west-spoke2 to the Green Network Domain.
Go to CoPilot > Networking> Network Segmentation > Network Domains
Click the pencil icon to edit the Green network domain.

Select the gateway azure-us-west-spoke2 from the drop-down window selecting the "Associations" field.
Then click Save:

After this step, this is what Lab 7 topology looks like:
SSH into azure-us-west-spoke1-test1 and from there, ping azure-us-west-spoke2-test1 on its private IP.

Pings are passing because the Allow-all rule on the Firewall is permitting traffic from any zone to any zone to pass.
Back on the PAN firewall, click on the Monitor tab. Then paste this string in the filter bar and hit Enter, which will apply the filter:

Traffic is passing through firewall because azure-us-west-spoke1 and azure-us-west-spoke2 both are in the Inspected List:
5.2. Azure to GCP
While on azure-us-west-spoke1-test1, ping gcp-us-central1-spoke1-test1.

This still matches the Allow-all firewall rule. Moreover, it works because of the Connection Policy we had configured in the MCNS Lab.
Back on the PAN firewall, click the refresh button in the top-right corner to see the log entries for pinging the GCP spoke test VM.

After completing this Lab, the overall topology would look like this: