

1. Objective
The objective of this lab is to resolve an IP address overlap between an on-premises partner and the cloud. You will be using the Site2Cloud Mapped NAT feature to achieve this.
2. Site2Cloud Overview
Site2Cloud builds an encrypted connection between two sites over the Internet in an easy-to-use and template-driven manner. Its workflow is similar to any CSP’s virtual private network workflow.
On one end of the tunnel is an Aviatrix Gateway; on the other could be an on-premises router, firewall or another public cloud VPC/VNet that Aviatrix Controller does not manage.
3. Topology
In this lab, you will achieve Site2Cloud connectivity to a Cisco Cloud Services Router 1000v (CSR) emulating an on-premises branch router.
In this lab, you will work with the overlapping IP addresses in this topology:
4. Configuration
4.1. Site2Cloud Connection (Cloud to On-Prem)
Go to Controller > SITE2CLOUD > Setup > (Step 2) Create a New Site2Cloud Connection > + ADD NEW
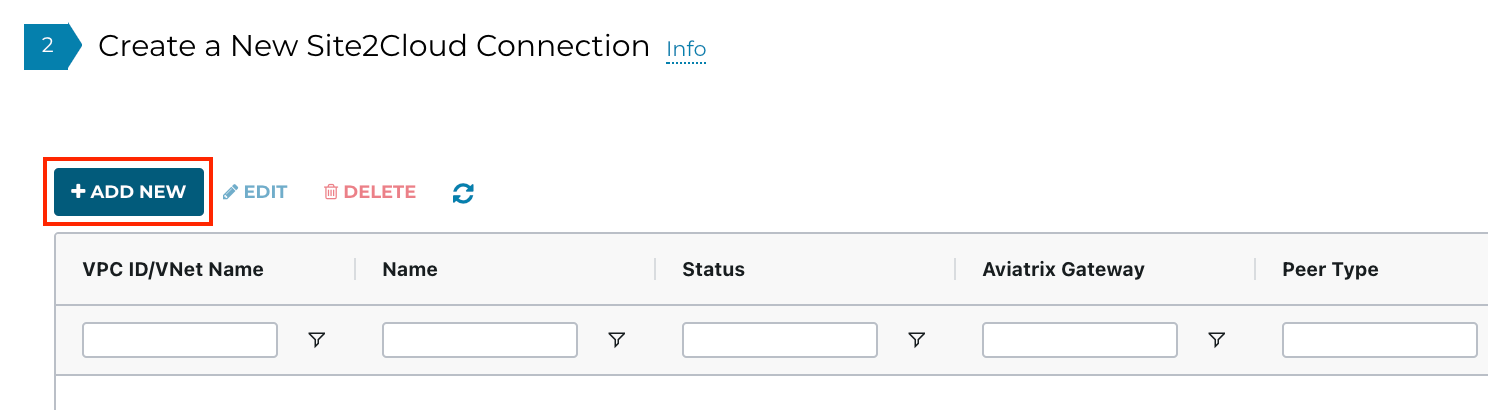
Create a connection from Cloud (GCP) to an on-prem Partner site.
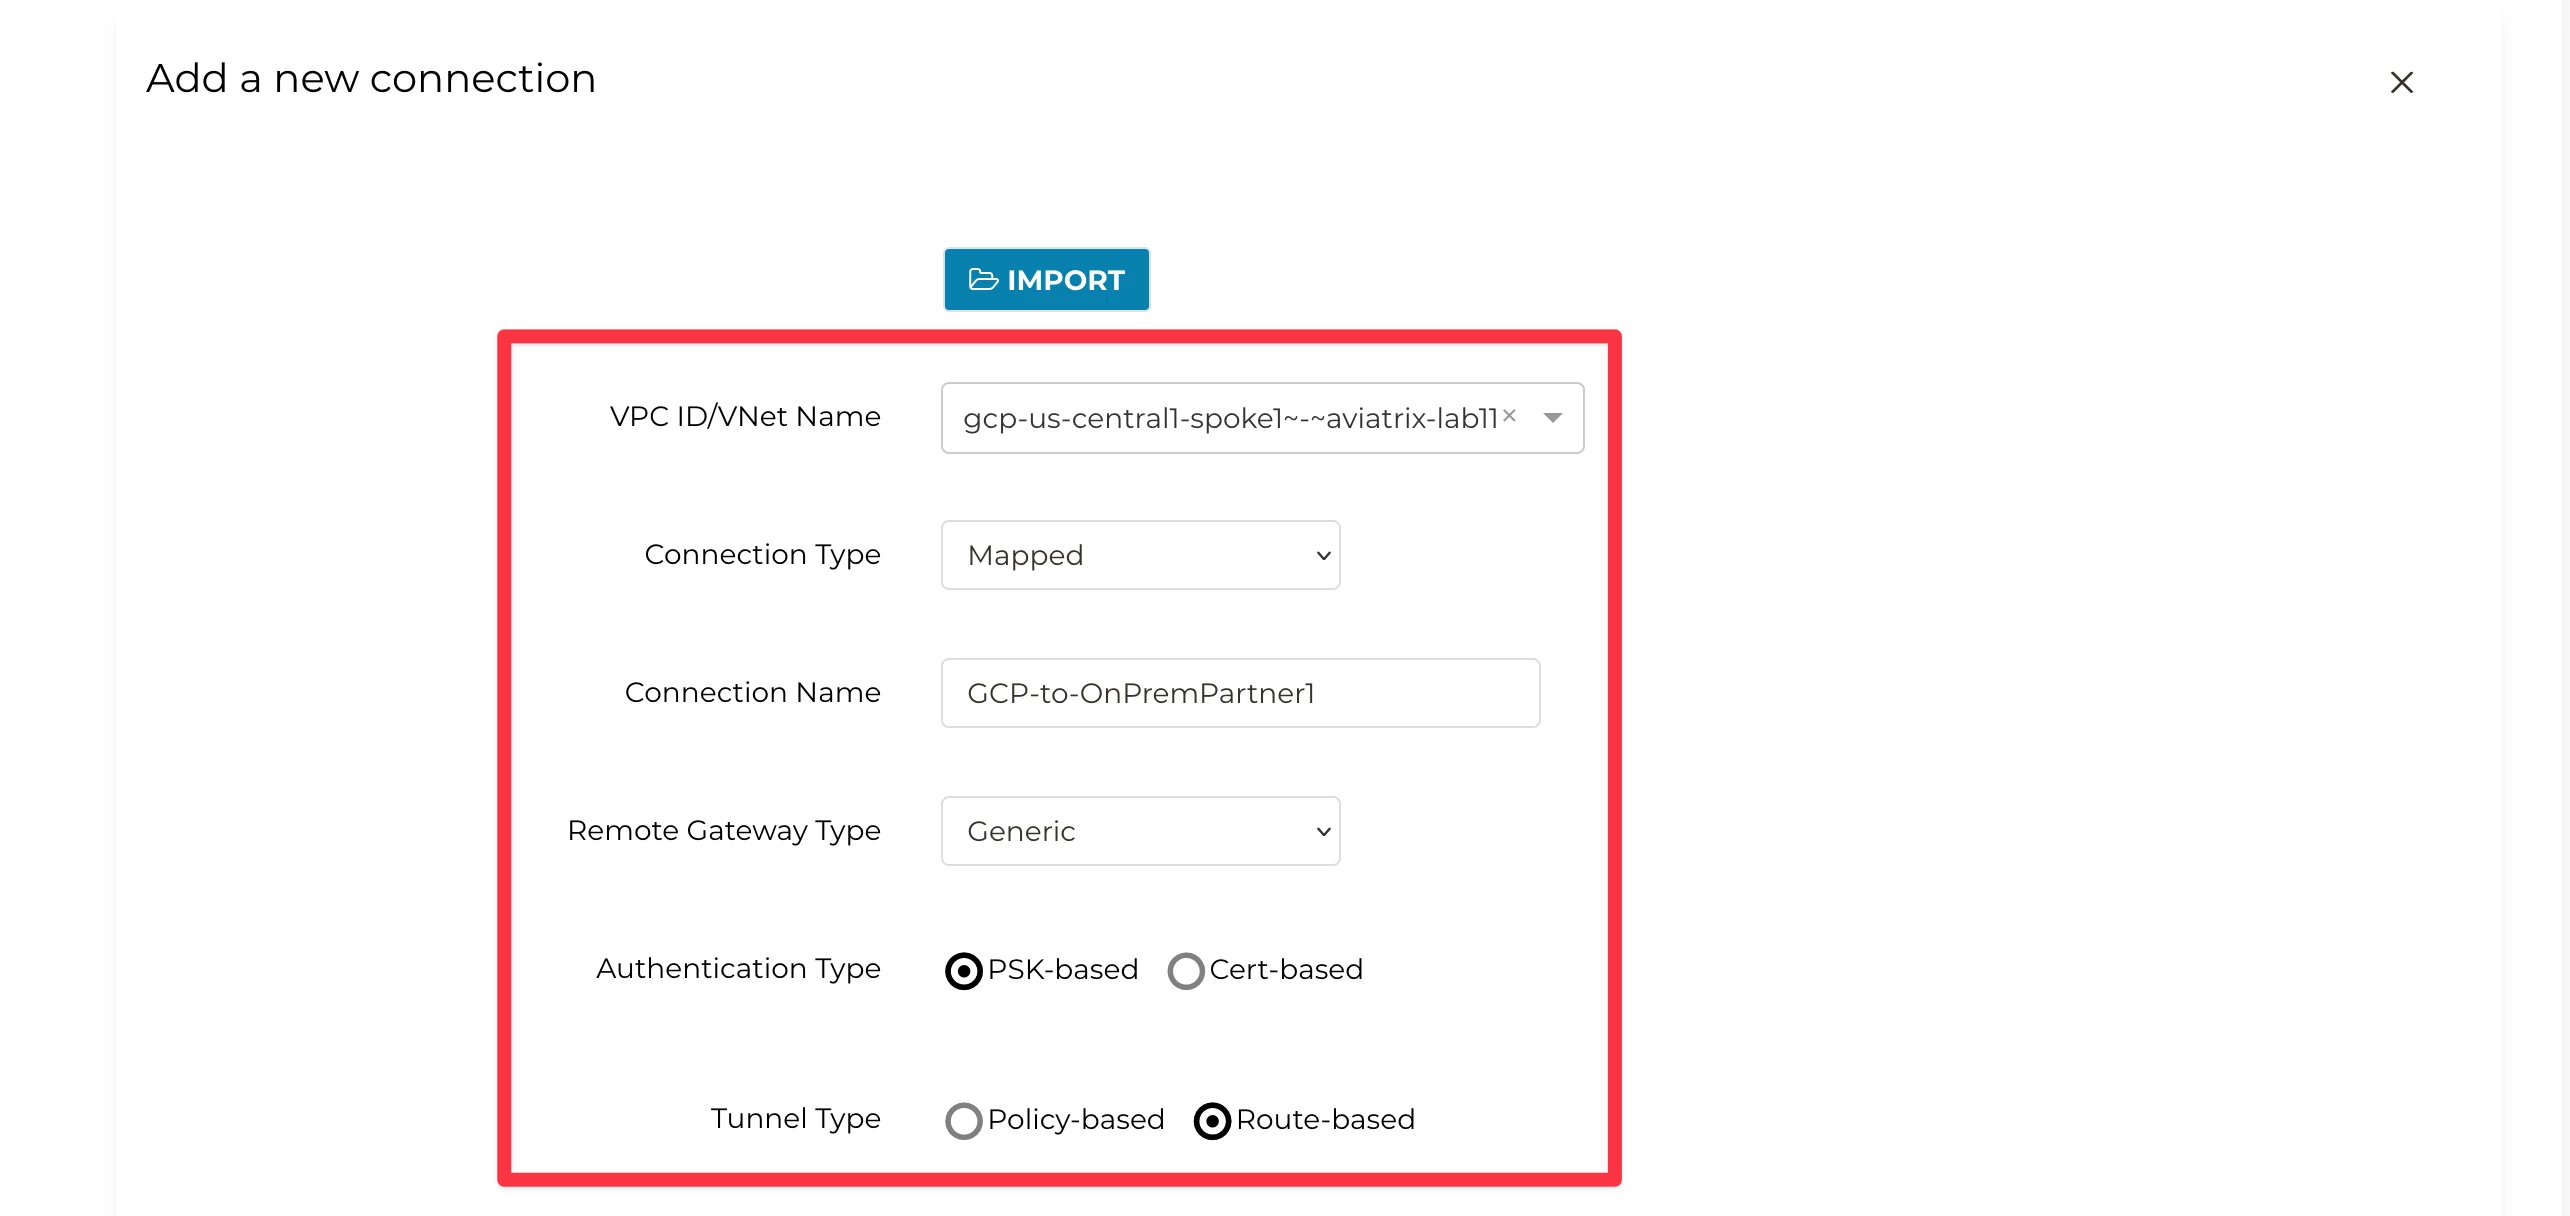
Use the following settings:
- VPC ID / VNet Name: gcp-us-central1-spoke1
- Connection Type: Mapped
- Connection Name: GCP-to-OnPremPartner1
- Remote Gateway Type: Generic
- Tunnel Type: Route-based
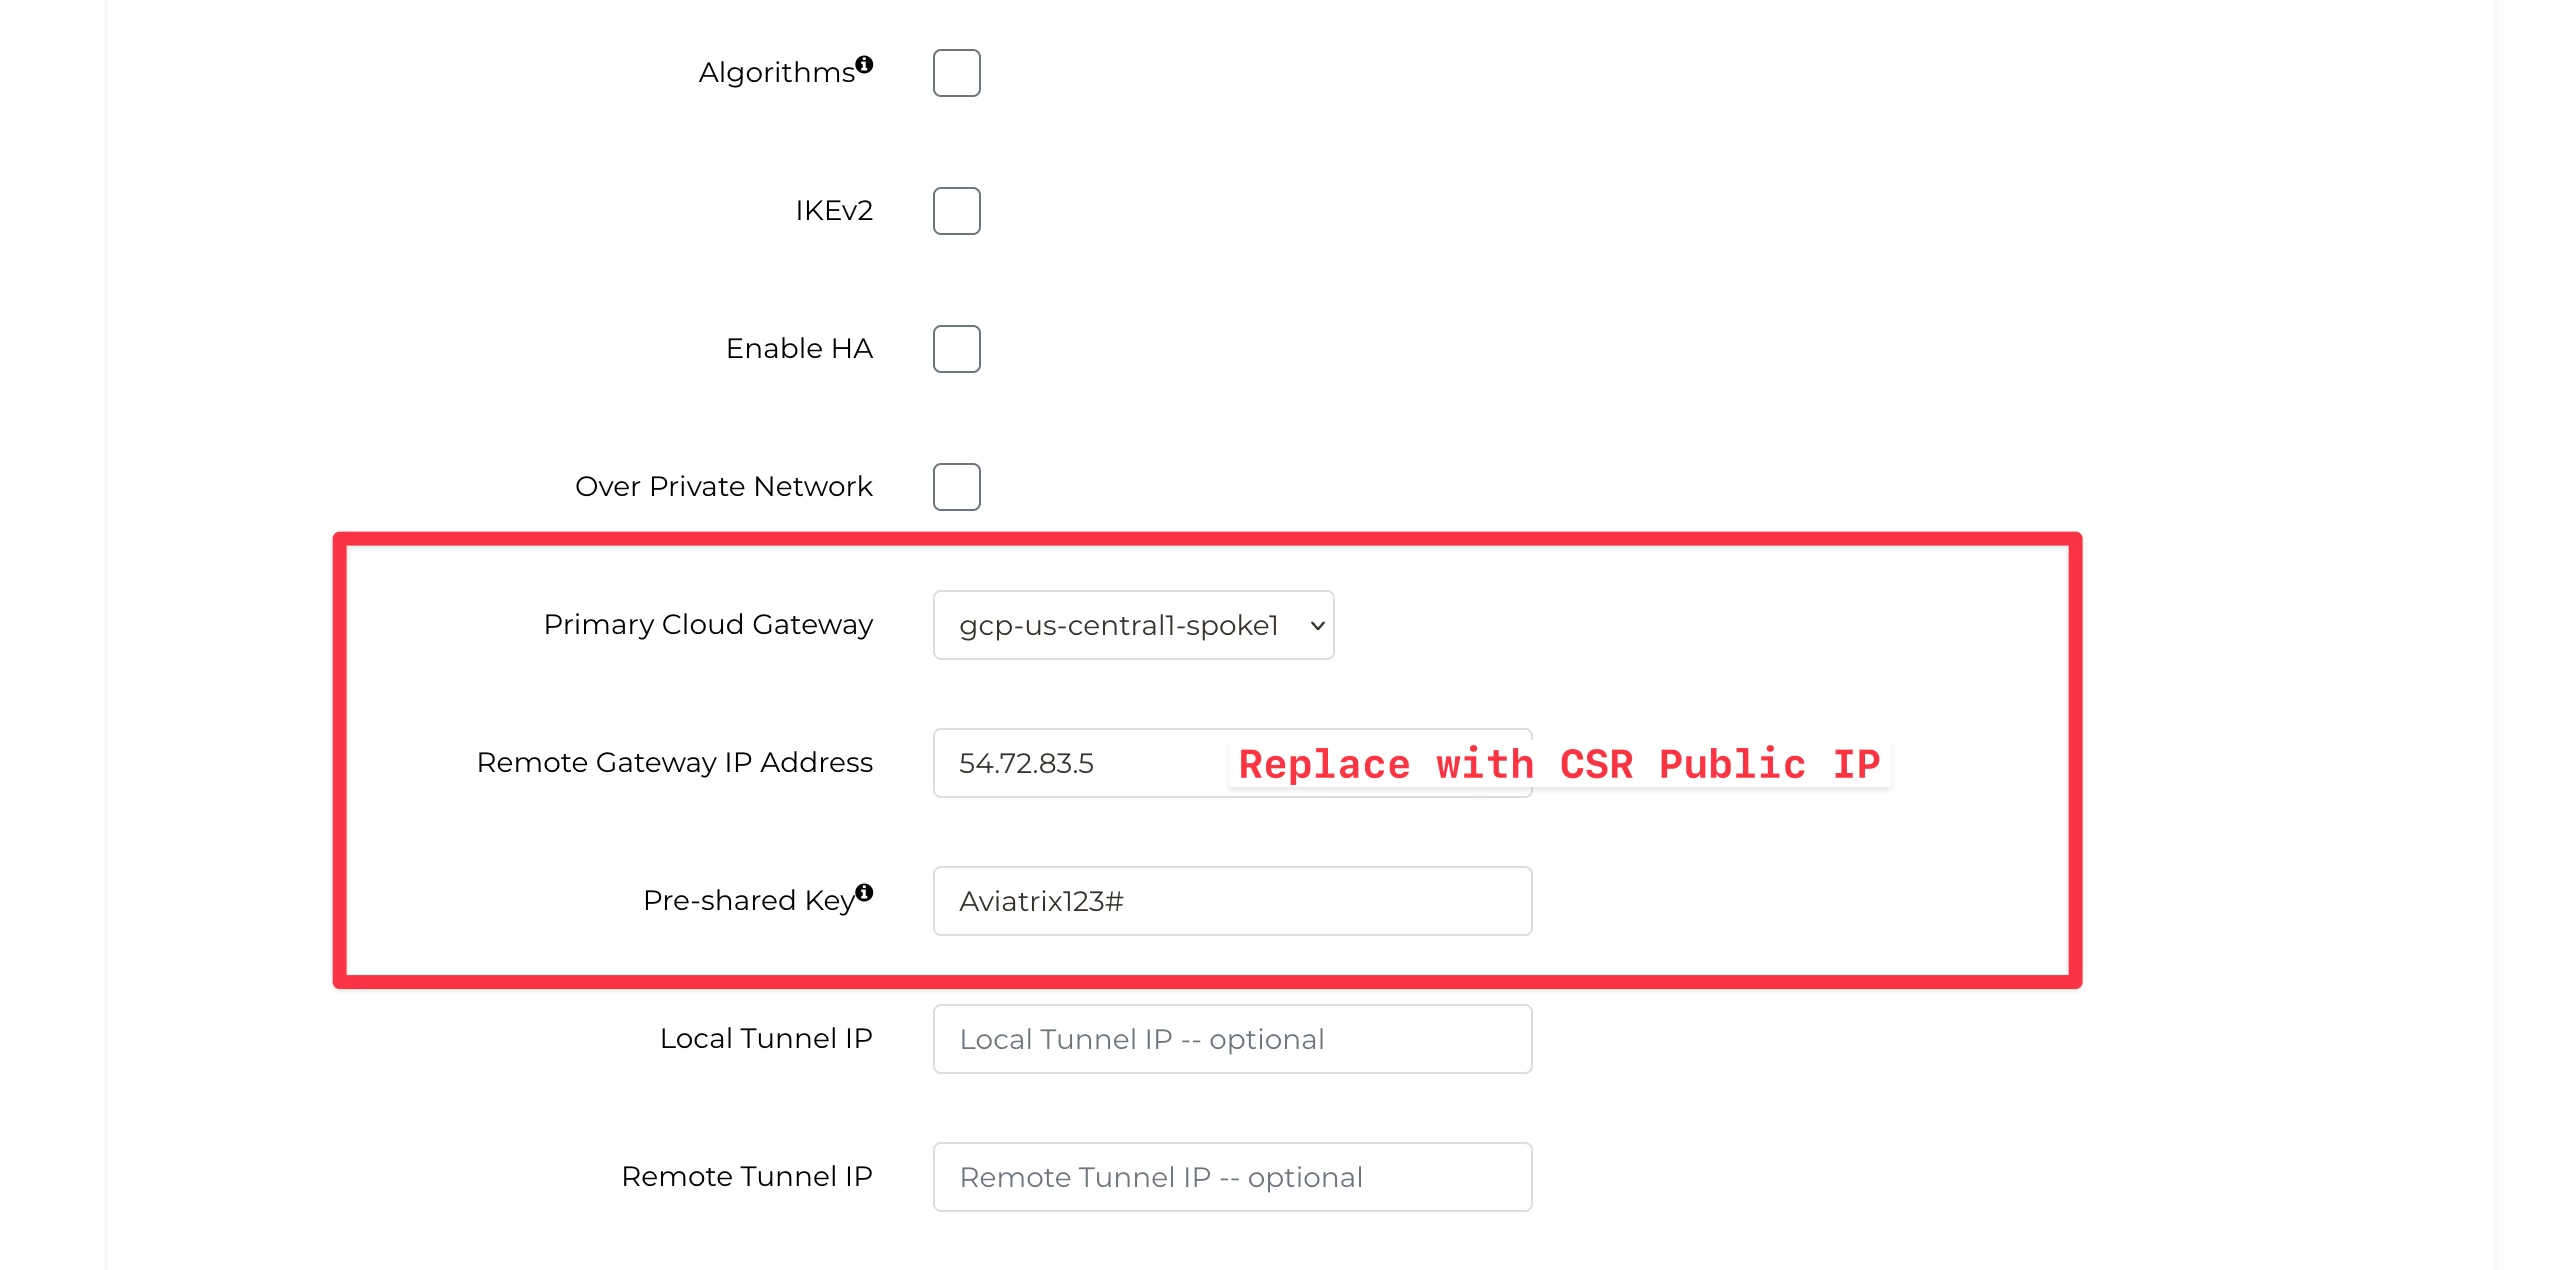
- Primary Cloud Gateway: gcp-us-central1-spoke1-agw
- Remote Gateway IP Address: [Refer to your Pod assignment for the CSR Public IP]
- Pre-shared Key: <set a key string and remember it>
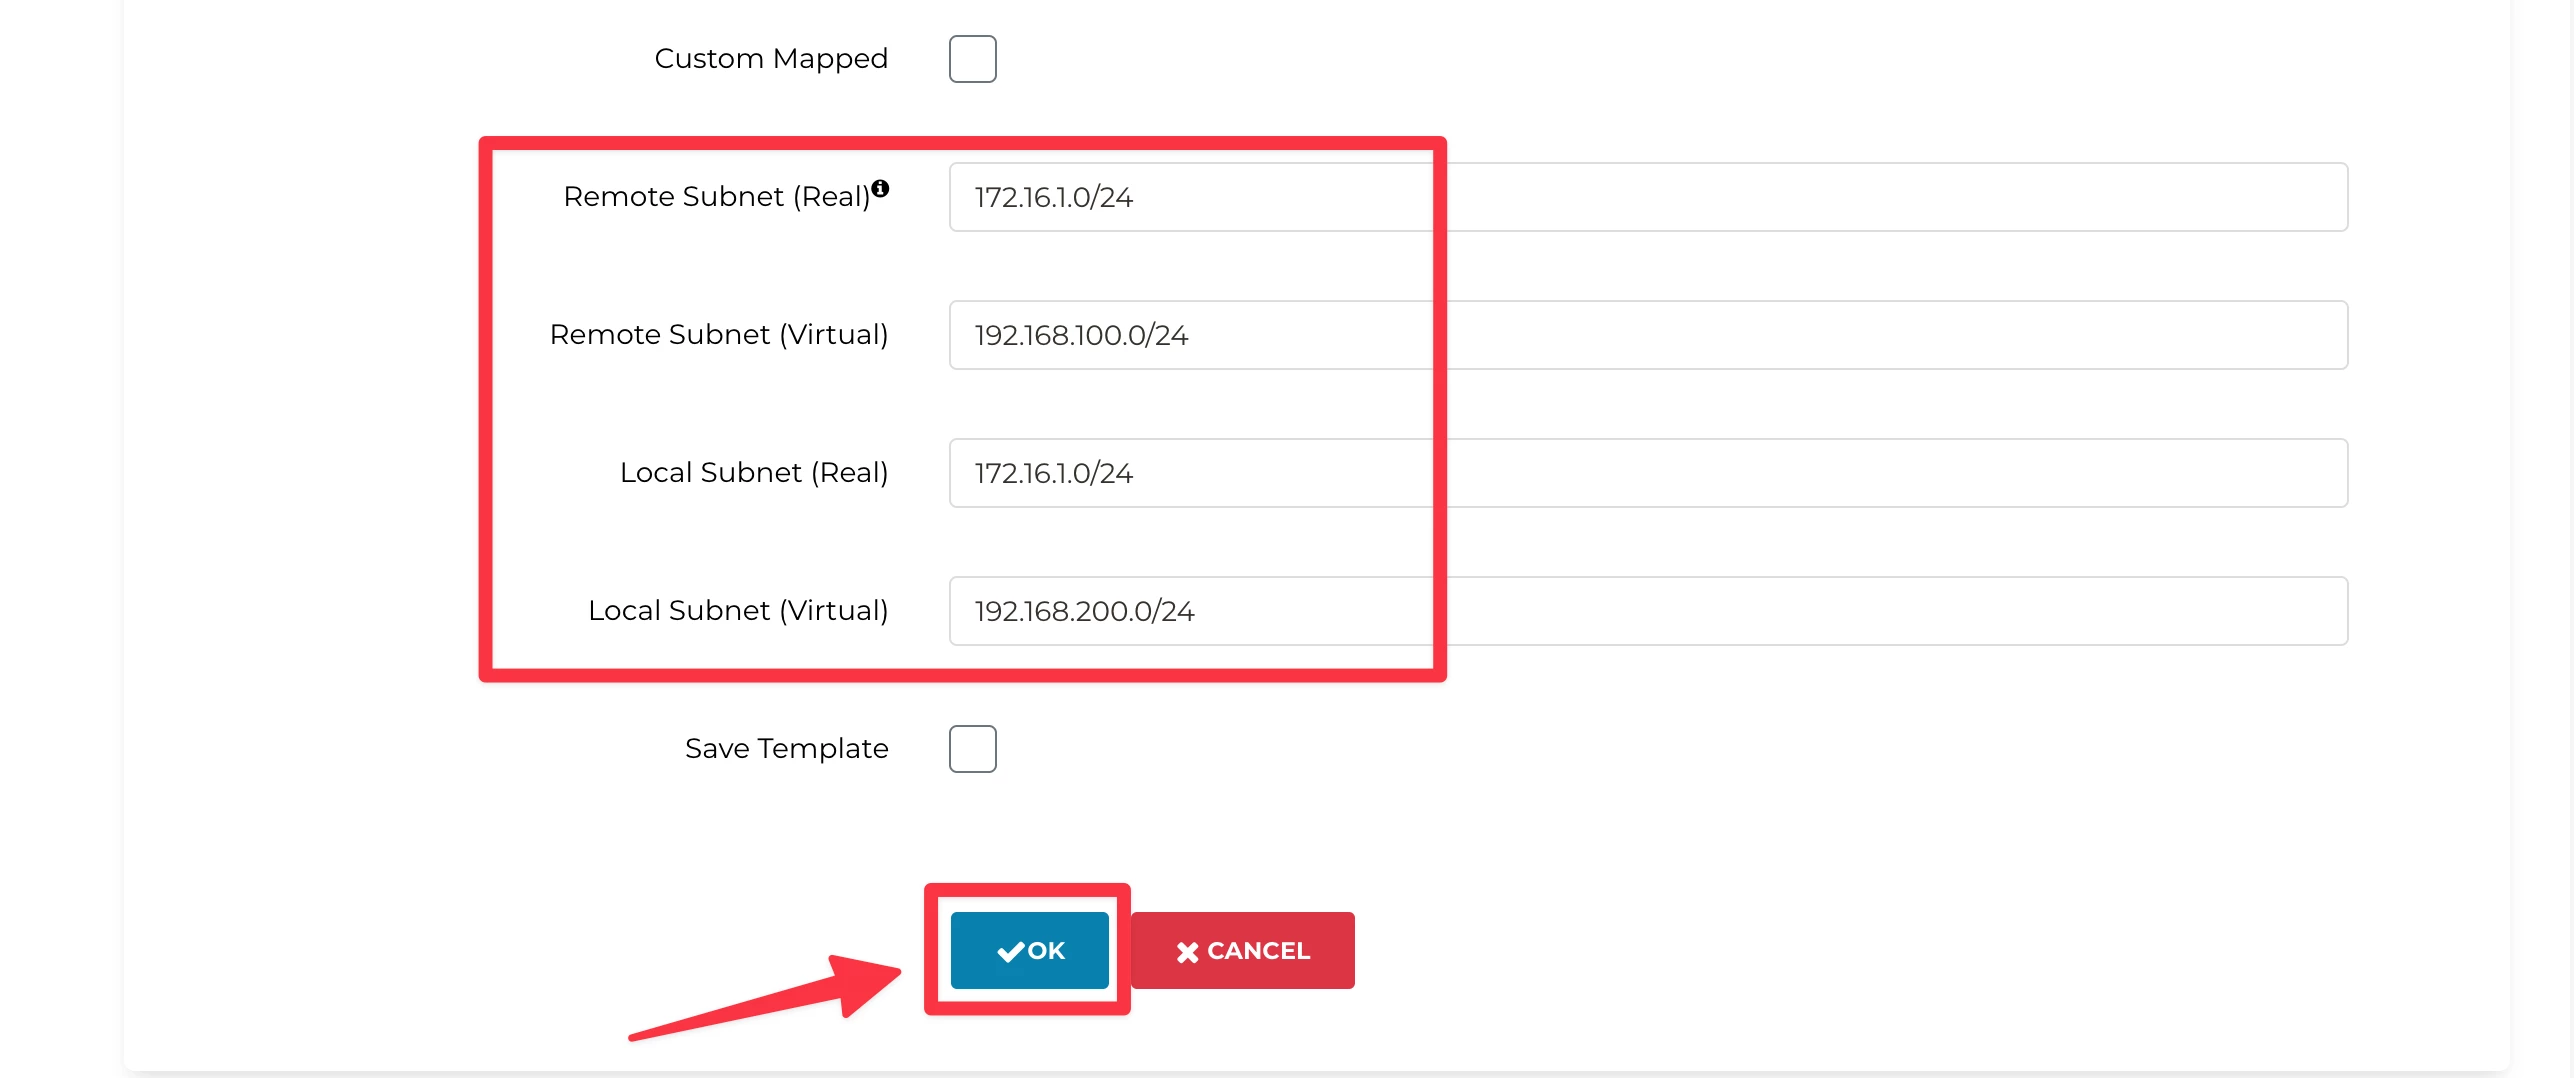
- Remote Subnet (Real): 172.16.1.0/24
- Remote Subnet (Virtual): 192.168.100.0/24
- Local Subnet (Real): 172.16.1.0/24
- Local Subnet (Virtual): 192.168.200.0/24
Since On-Prem-Partner1 uses the overlapping IP space, we will utilise the Aviatrix Mapped NAT feature and use two virtual subnets.
192.168.100.0/24 will be used for the cloud to reach on-prem resources, and 1:1 NAT will be used.
192.168.200.0/24 will be used from on-prem to reach cloud resources. For example, gcp-us-central1-test1 (172.16.1.100) will be reached at 192.168.200.100 due to 1:1 NAT.
This will create the first leg of the connection from the Cloud to the Site. This will stay Down until the other end is configured.
4.2. Site2Cloud Connection (On-prem to Cloud)
The Controller provides a template that can be used to configure the remote router/firewall.
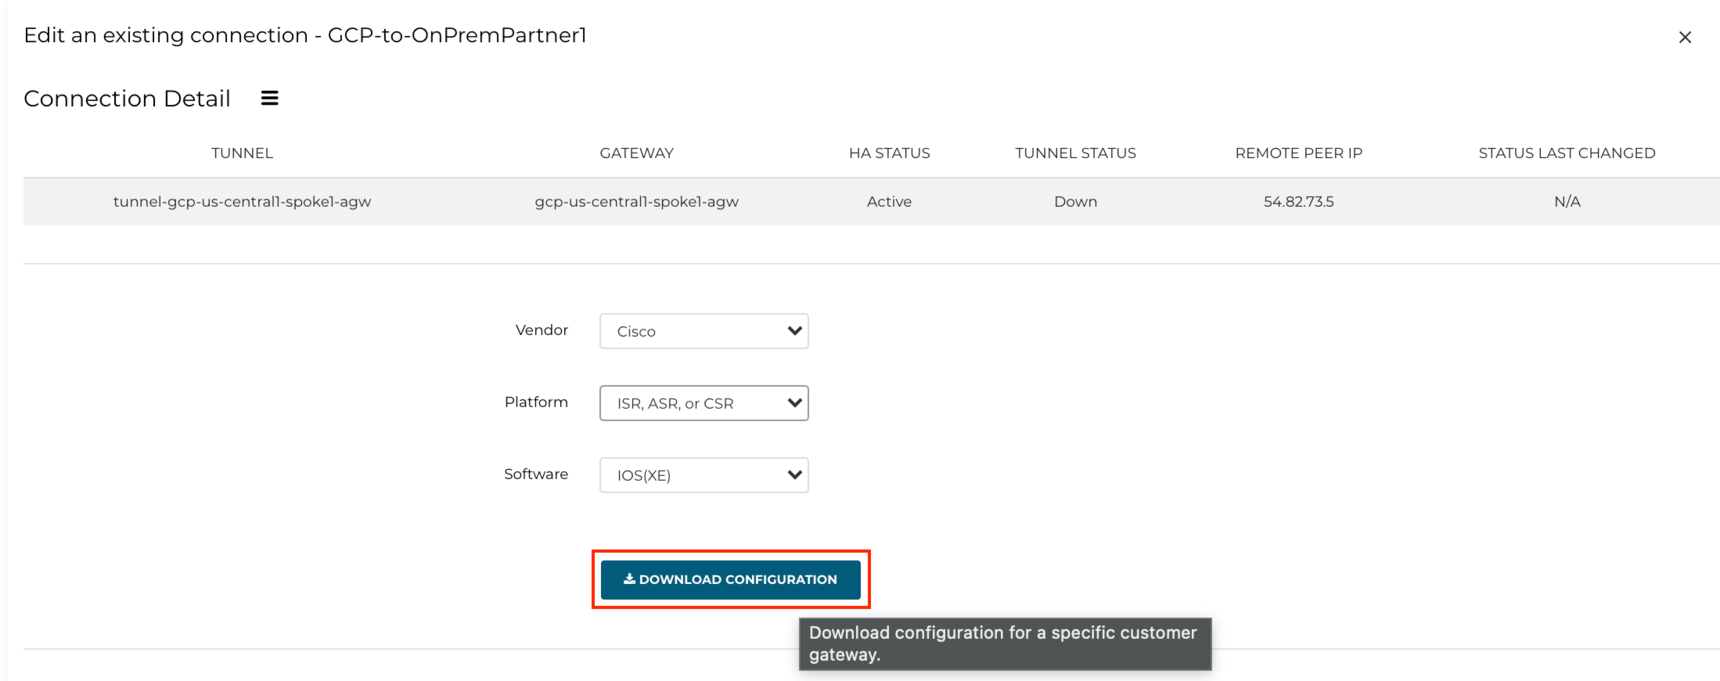
Select the Site-to-Cloud connection row you created and click EDIT to generate and download the configuration template.

Download the configurations for Cisco ISR/ASR by clicking Download Configuration:
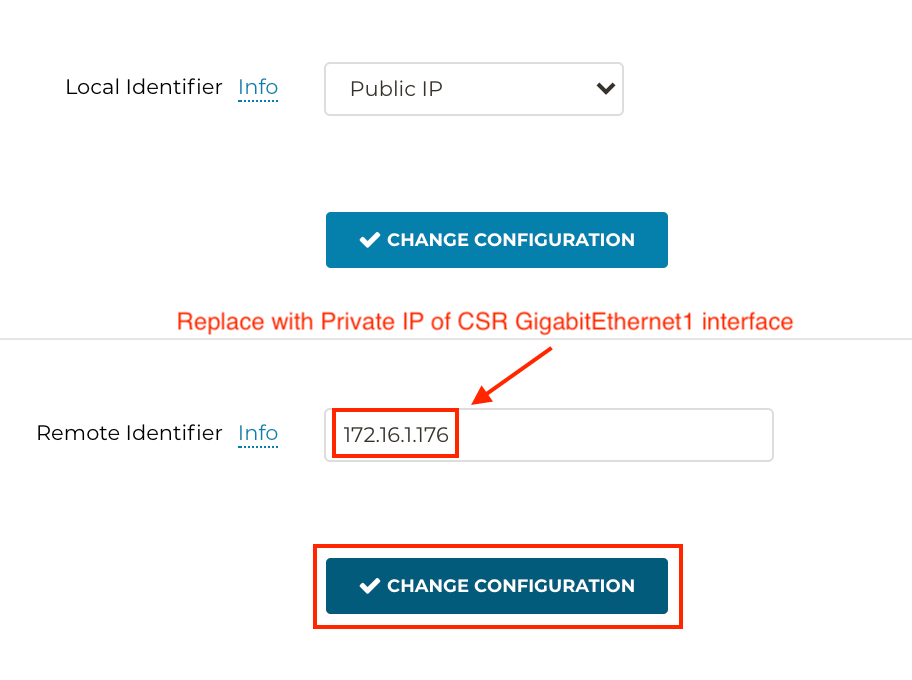
Note that the Cisco CSR is not acting as an actual branch router because it is being NAT'd by an AWS IGW. For that purpose, you need to specify that the Remote Identifier of the IKE tunnel is the private IP of the CSR, not the public IP.
To find out the Private IP of the CSR, SSH as admin to the on-premises router (same as the Remote Peer IP above) and issue the IOS command show ip interface brief (can be abbreviated to sh ip int br).
Hint: Refer to your POD portal for retrieving the Public IP of the CSR.

Use the Private IP of the GigabitEthernet1 interface. It would be something in 172.16.1.0/24, such as 172.16.1.176, in the above output.
Then click Change Configuration for the Remote Identifier.
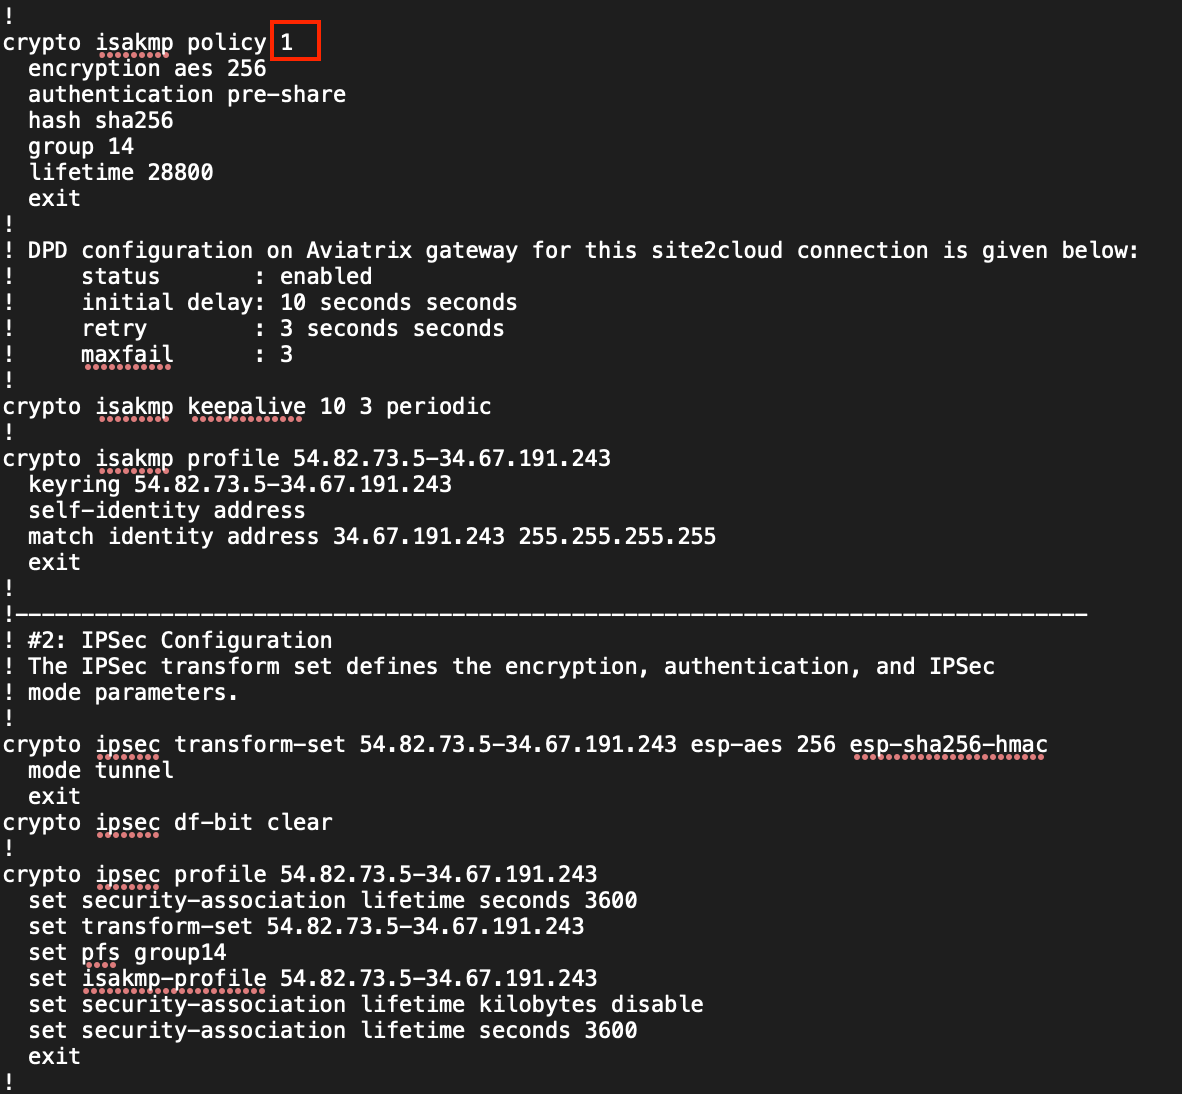
Make the following four changes to the downloaded Site2Cloud text file:
<crypto_policy_number>: 1
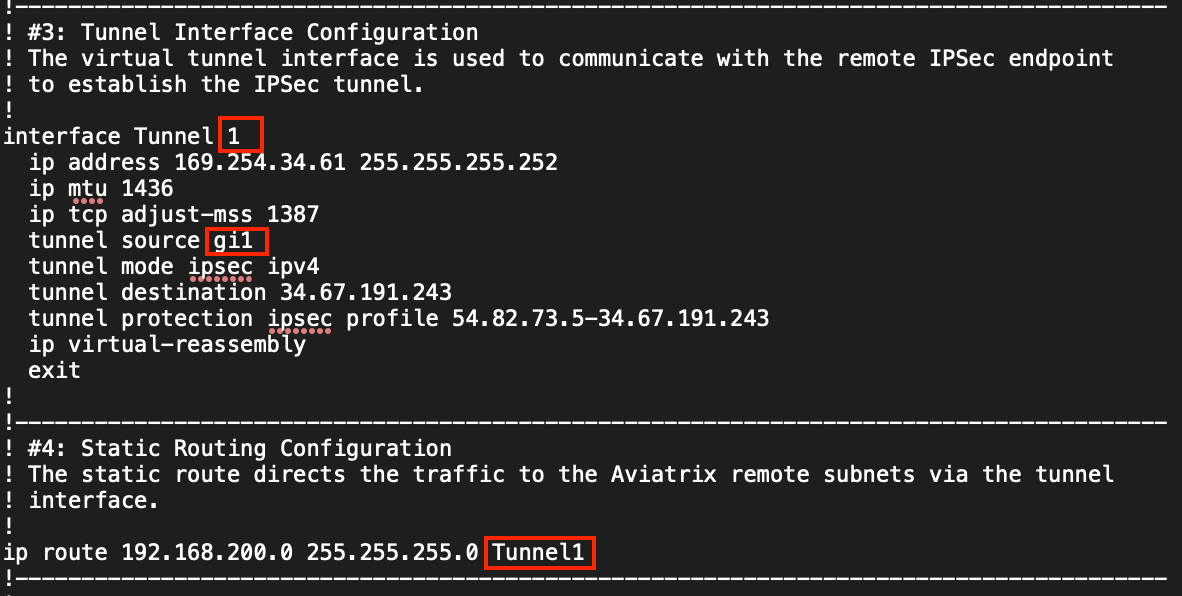
<tunnel_number1>: 1
<ios_wan_interface1>: gi1
ip route 192.168.200.0 255.255.255.0 Tunnel<tunnel_number>: 1
Copy the entire configuration to the clipboard.
If your SSH session to the Cisco CSR hasn't timed out, SSH back in (please refer to the podX.txt file for its public IP). Type configure terminal (can be abbreviated to conf t)

Paste the configuration to the terminal.
After doing so, type end to exit configuration mode, followed by sh ip int br to verify that the tunnel interface is up on the CSR.

5. Verification
Go to Controller > SITE2CLOUD > Setup
Verify the newly created tunnel is up (might take a few seconds once configuration is applied on the CSR):

Go to CoPilot > Cloud Fabric > Topology > Overview (default TAB)
Click to expand the gcp-us-central1-spoke1 to view the on-premises connection:
Go to OnPrem Router > SSH Console.
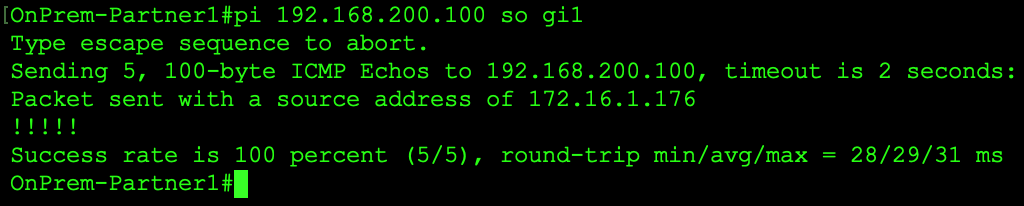
From the on-premises router’s console, enter a ping sourced from the GigabitEthernet1 interface to the test instance in GCP (gcp-us-central1-spoke1-test1) as follows:
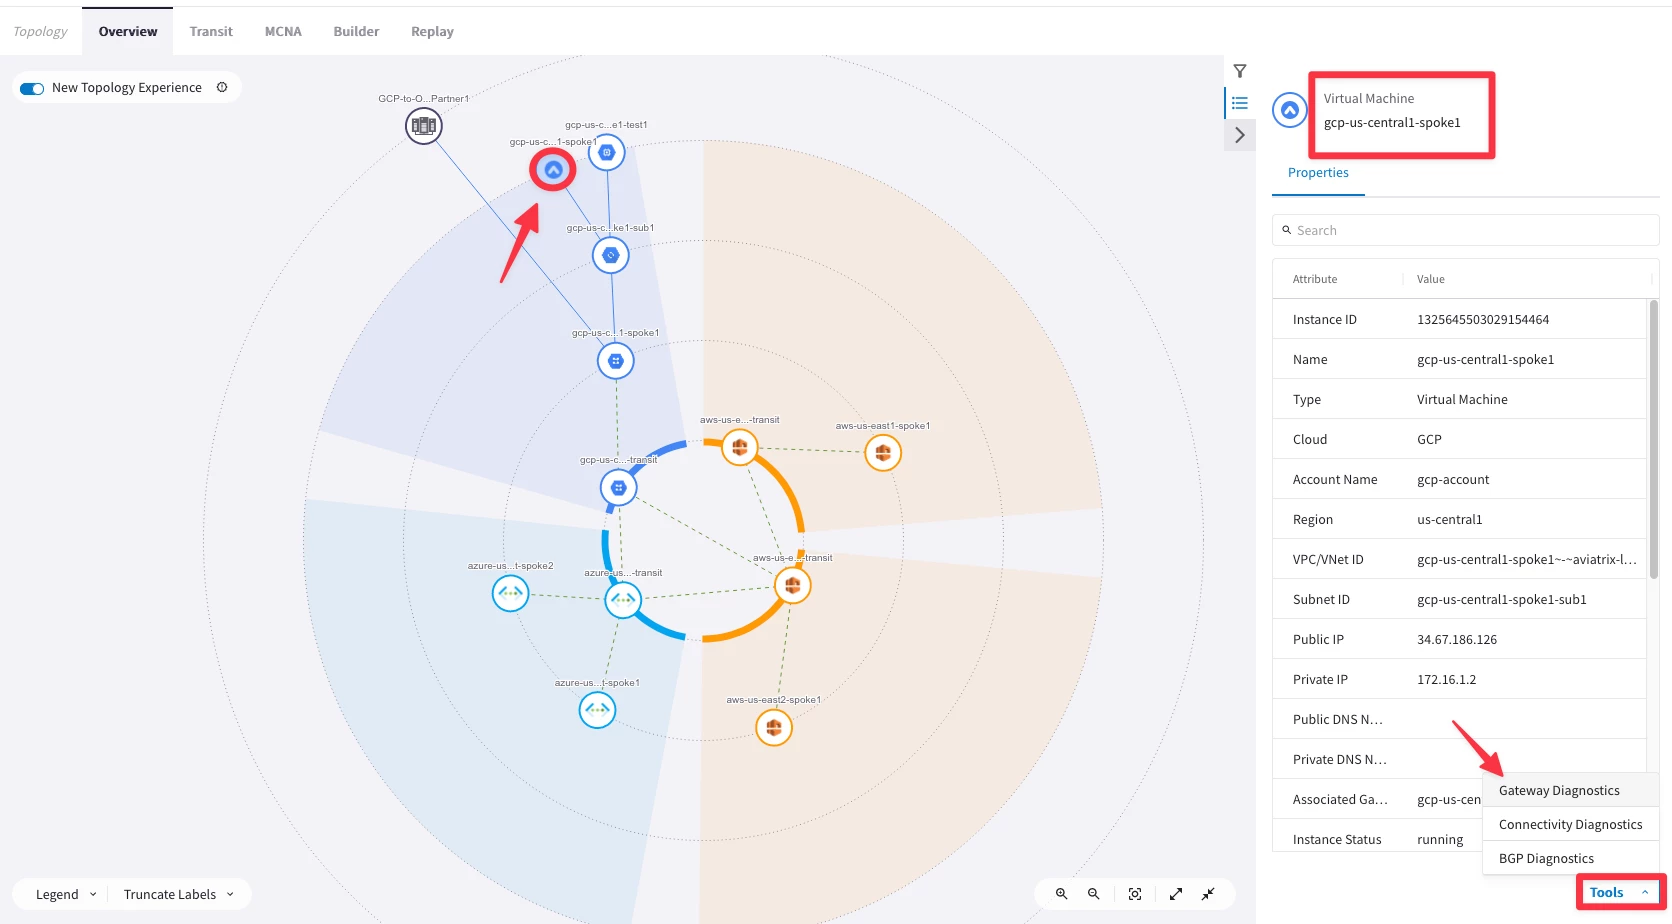
Then go to CoPilot > Cloud Fabric > Topology > Overview (default TAB) and click on the icon of the Spoke Gateway gcp-us-central1-spoke1 and then click on Tools and then click on Gateway Diagnostics.
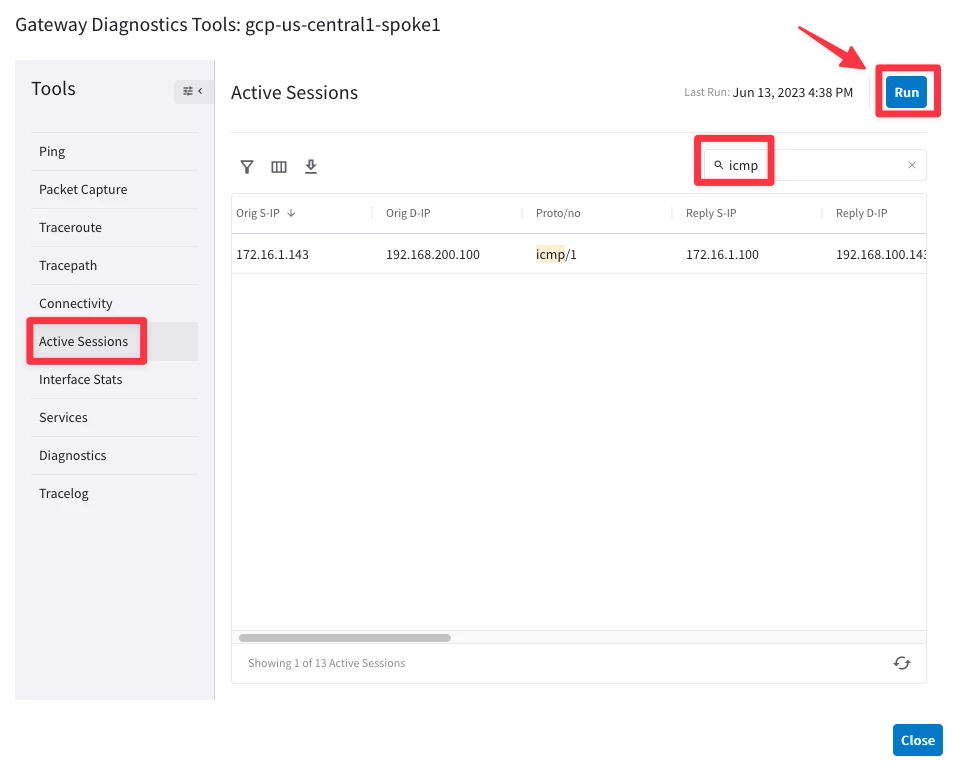
Choose the “Active Sessions” tab and in the Search field write “icmp” and then click on Run. You will notice the subnets involved in the Mapped NAT (you will have to relaunch the ping command once again!).
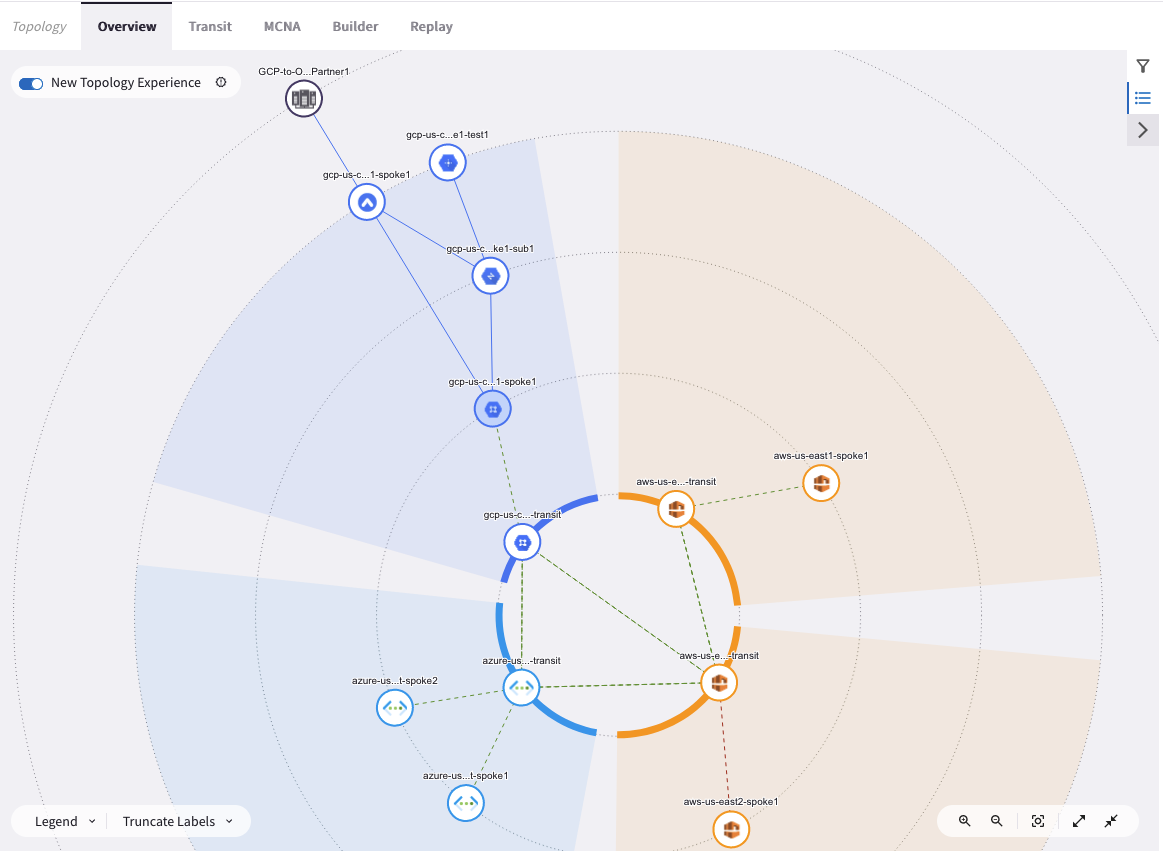
After completing this lab, this is what the overall lab topology would look like: