
In this blog, I will show you step by step integrating Okta IdP (identity provider) with Aviatrix controller.
Okta configuration
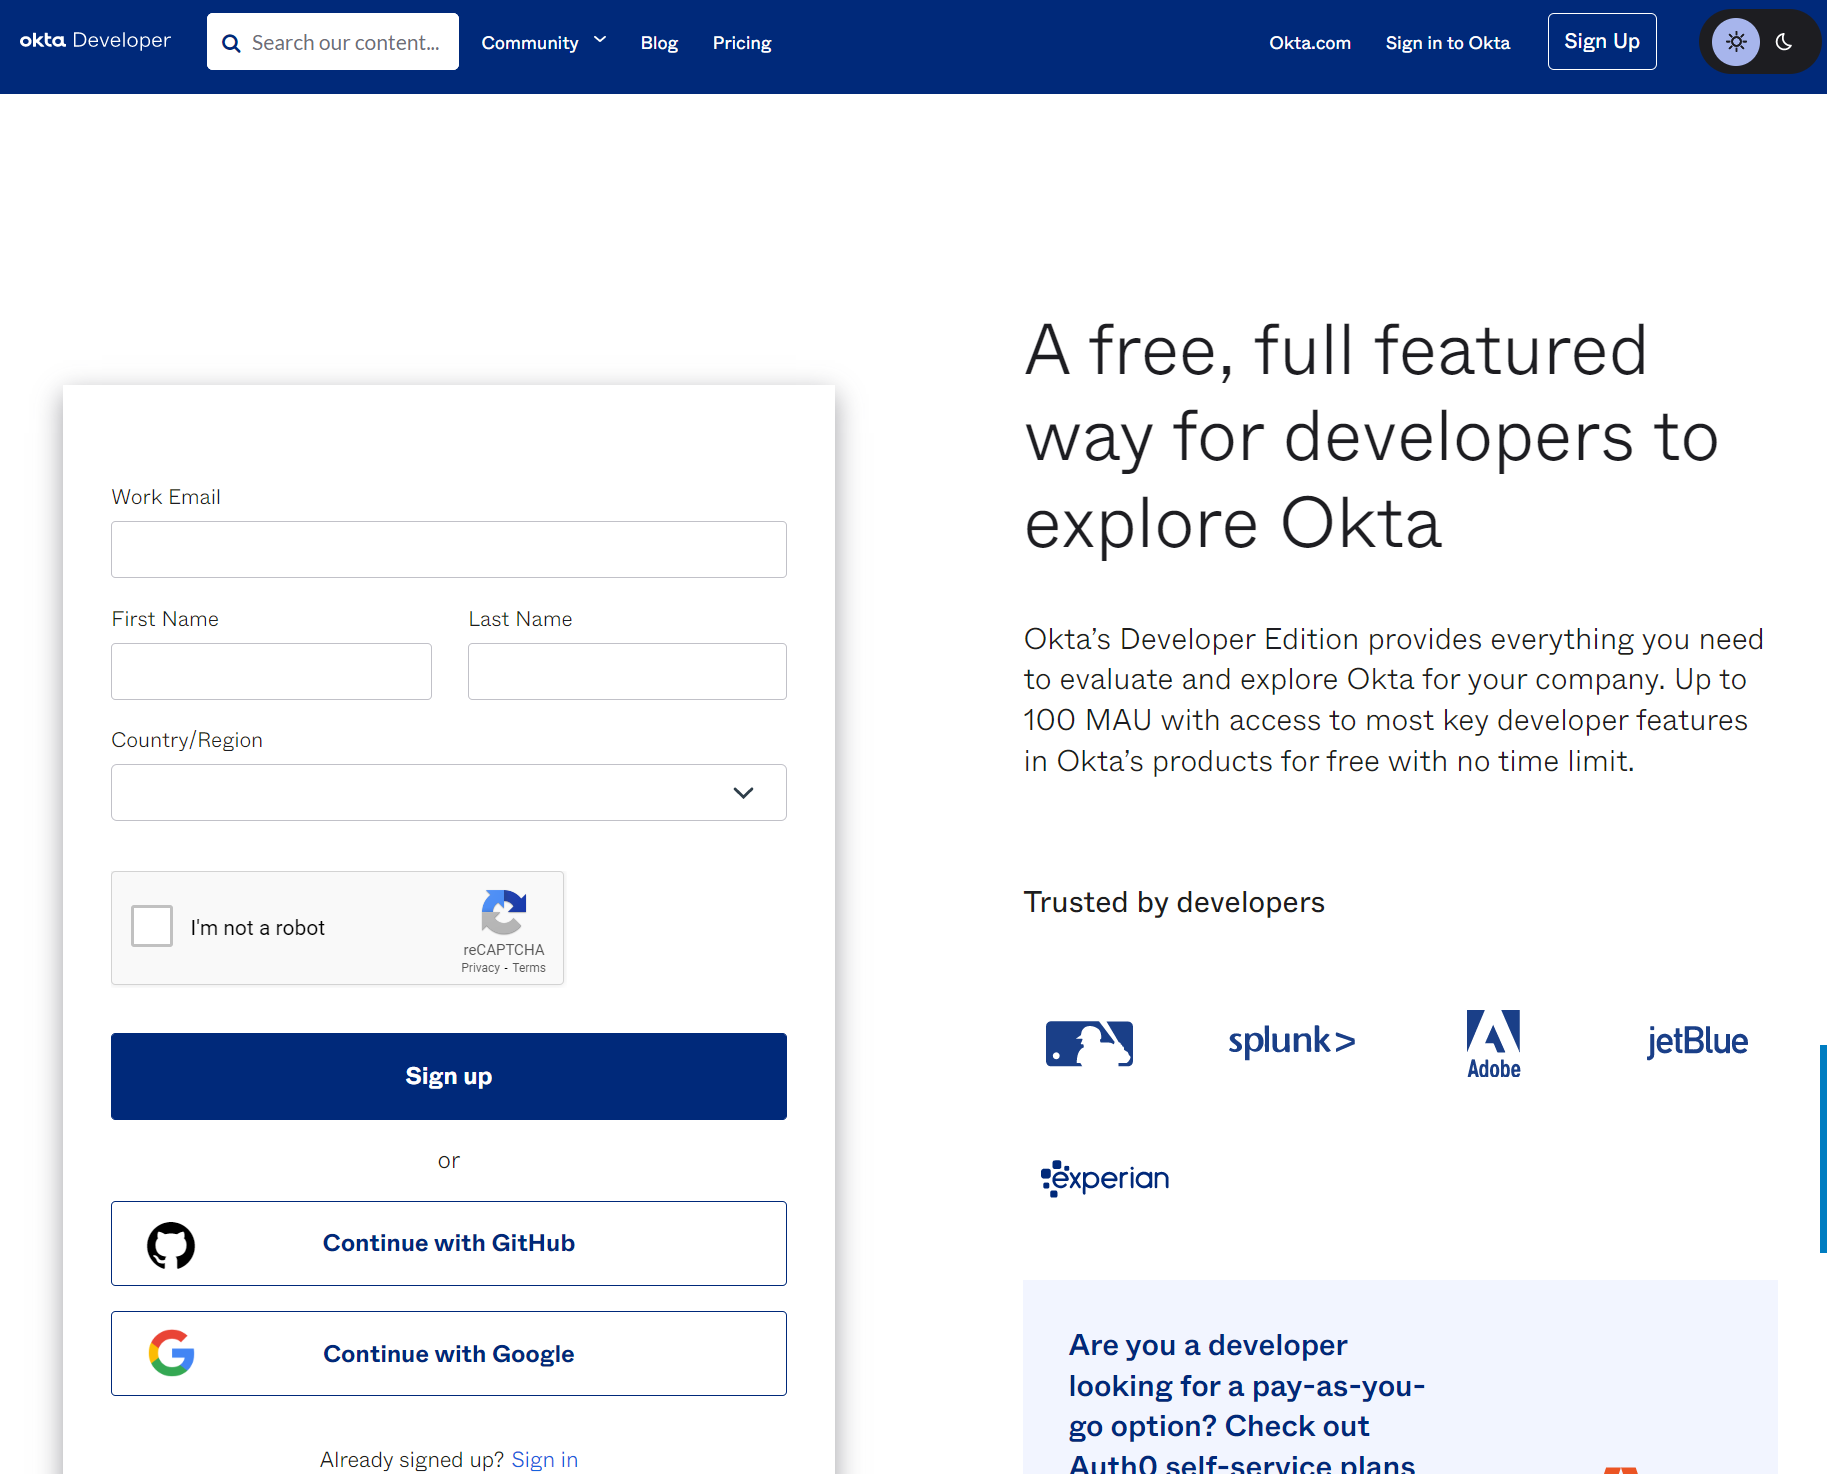
First sign up with okta. In this example, I’m signing up as a developer account:
https://developer.okta.com/signup/
I’ve chosen to continue with my google account
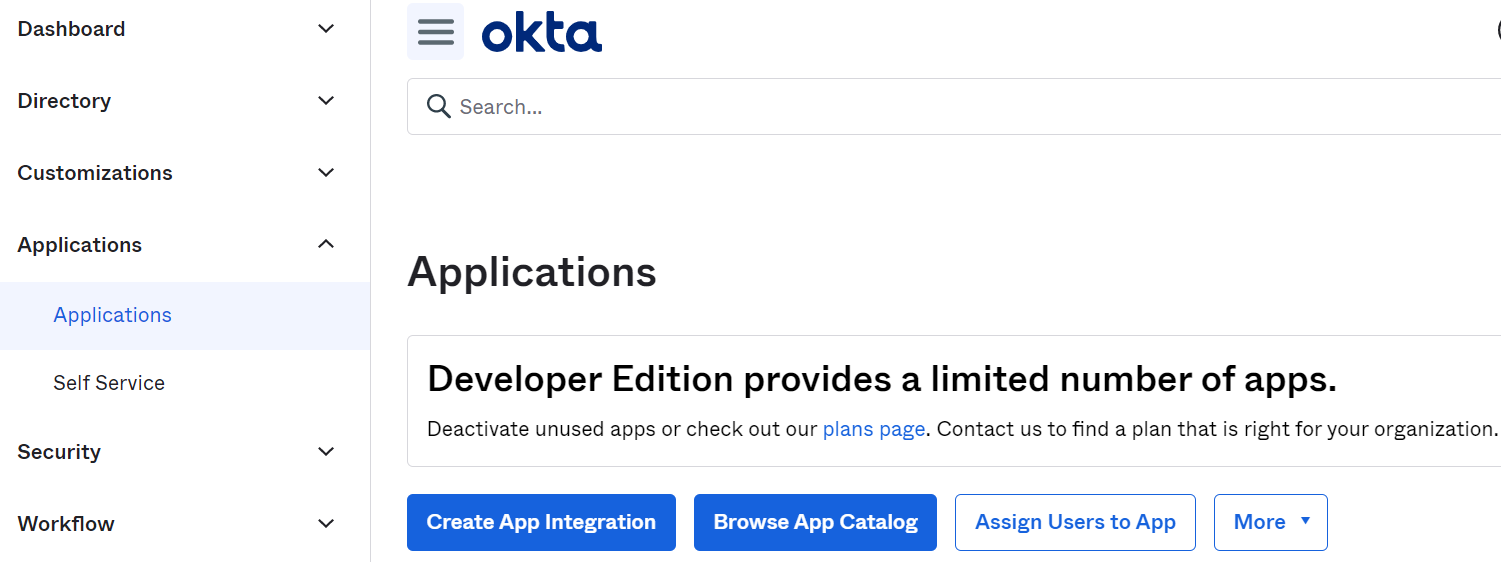
Once logged in, Applications -> Applications -> Create App Integration
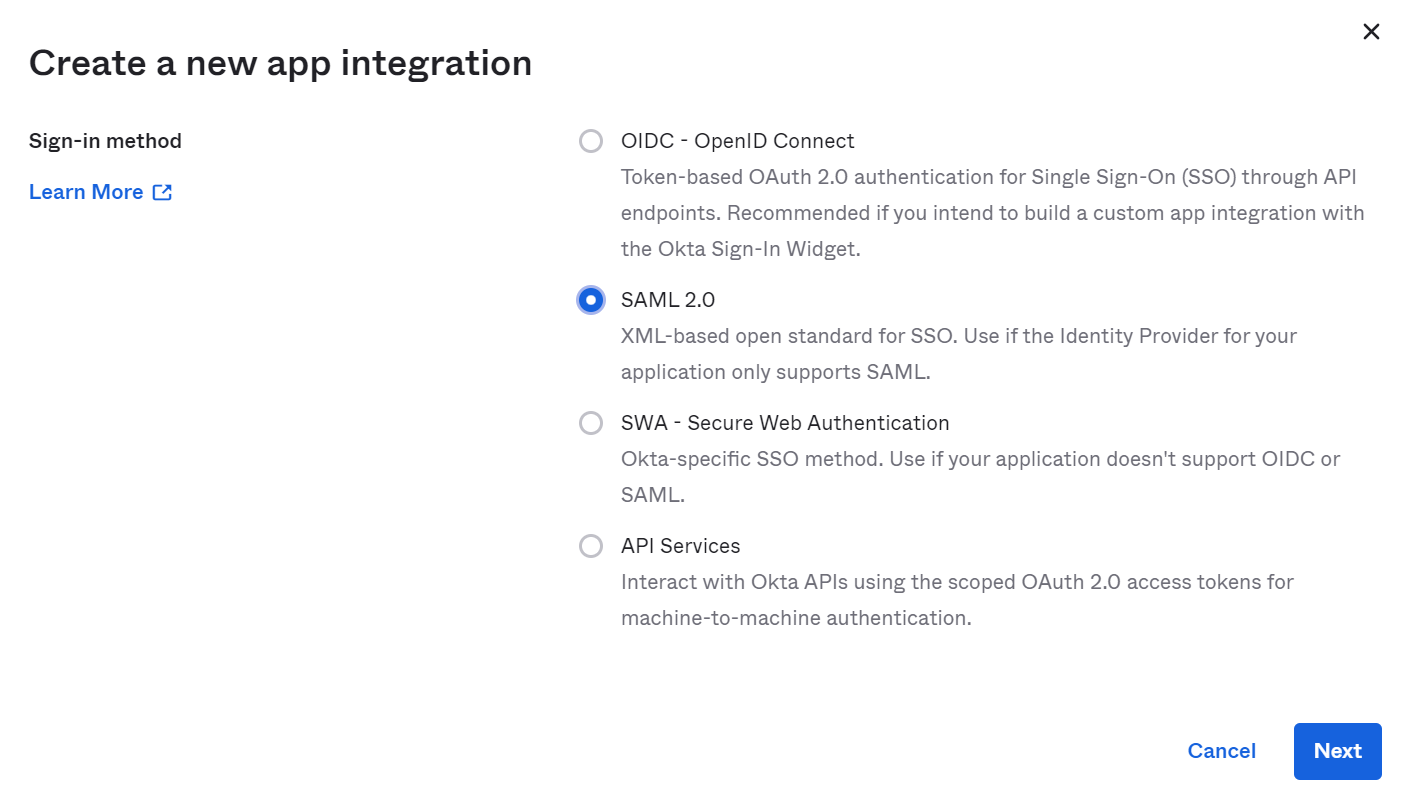
Choose SAML 2.0 as Sign-in method
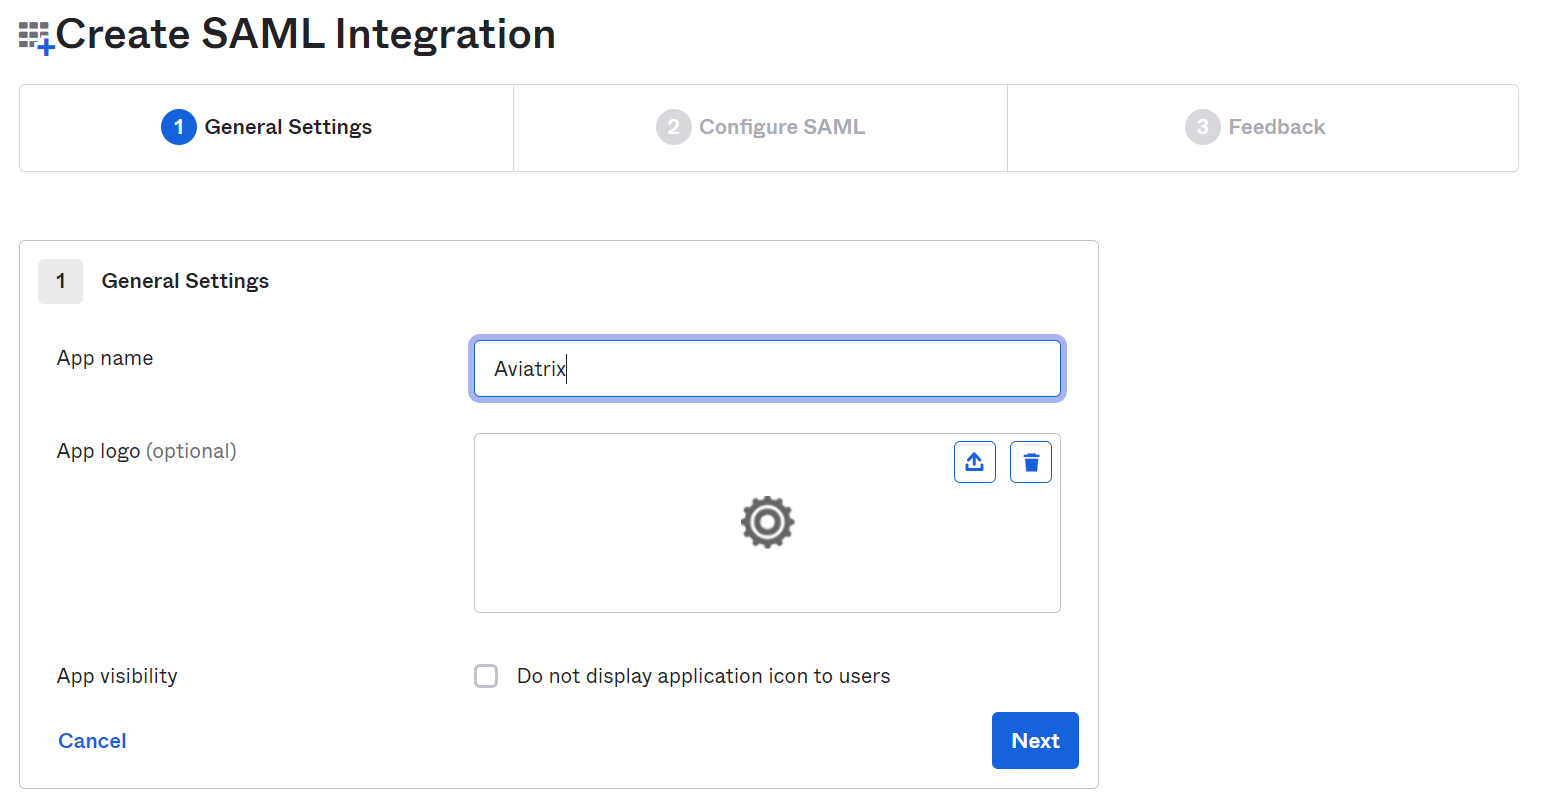
Provide App name, such as Aviatrix
App logo is optional, and leave App visibility unchecked
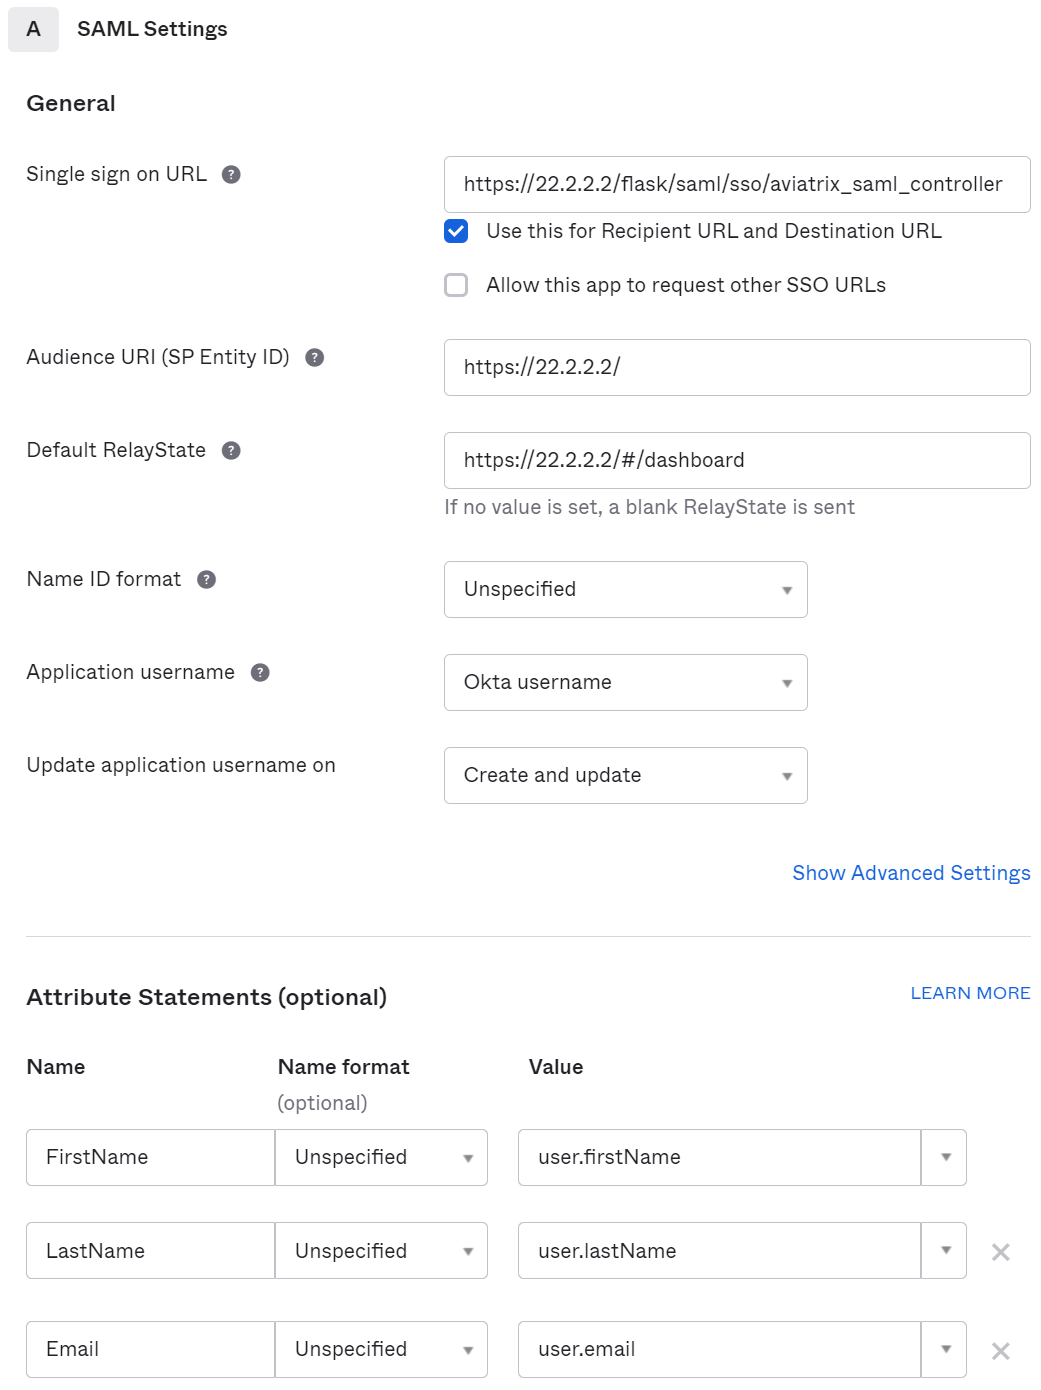
In SAML settings
- General
FieldValue
| Single sign on URL | https://[host]/flask/saml/sso/[Endpoint Name] |
| Audience URI (SP Entity ID) | https://[host]/ |
| Default RelayState | https://[host]/#/dashboard |
| Name ID format | Unspecified |
| Application username | Okta username |
| Update application username on | Create and update |
[host] is the hostname or IP of your Aviatrix controller.
[Endpoint Name] is an arbitrary identifier. This same value should be used when configuring SAML in the Aviatrix controller. The example uses aviatrix_saml_controller for [Endpoint Name]
https://[host]/#/dashboard must be set as the Default RelayState so that after SAML authenticates, user will be redirected to dashboard.
- Attribute Statements
NameName formatValue
| FirstName | Unspecified | user.firstName |
| LastName | Unspecified | user.lastName |
| Unspecified | user.email |
In following example:
[host] = 22.2.2.2
[Endpoint Name] = aviatrix_saml_controller
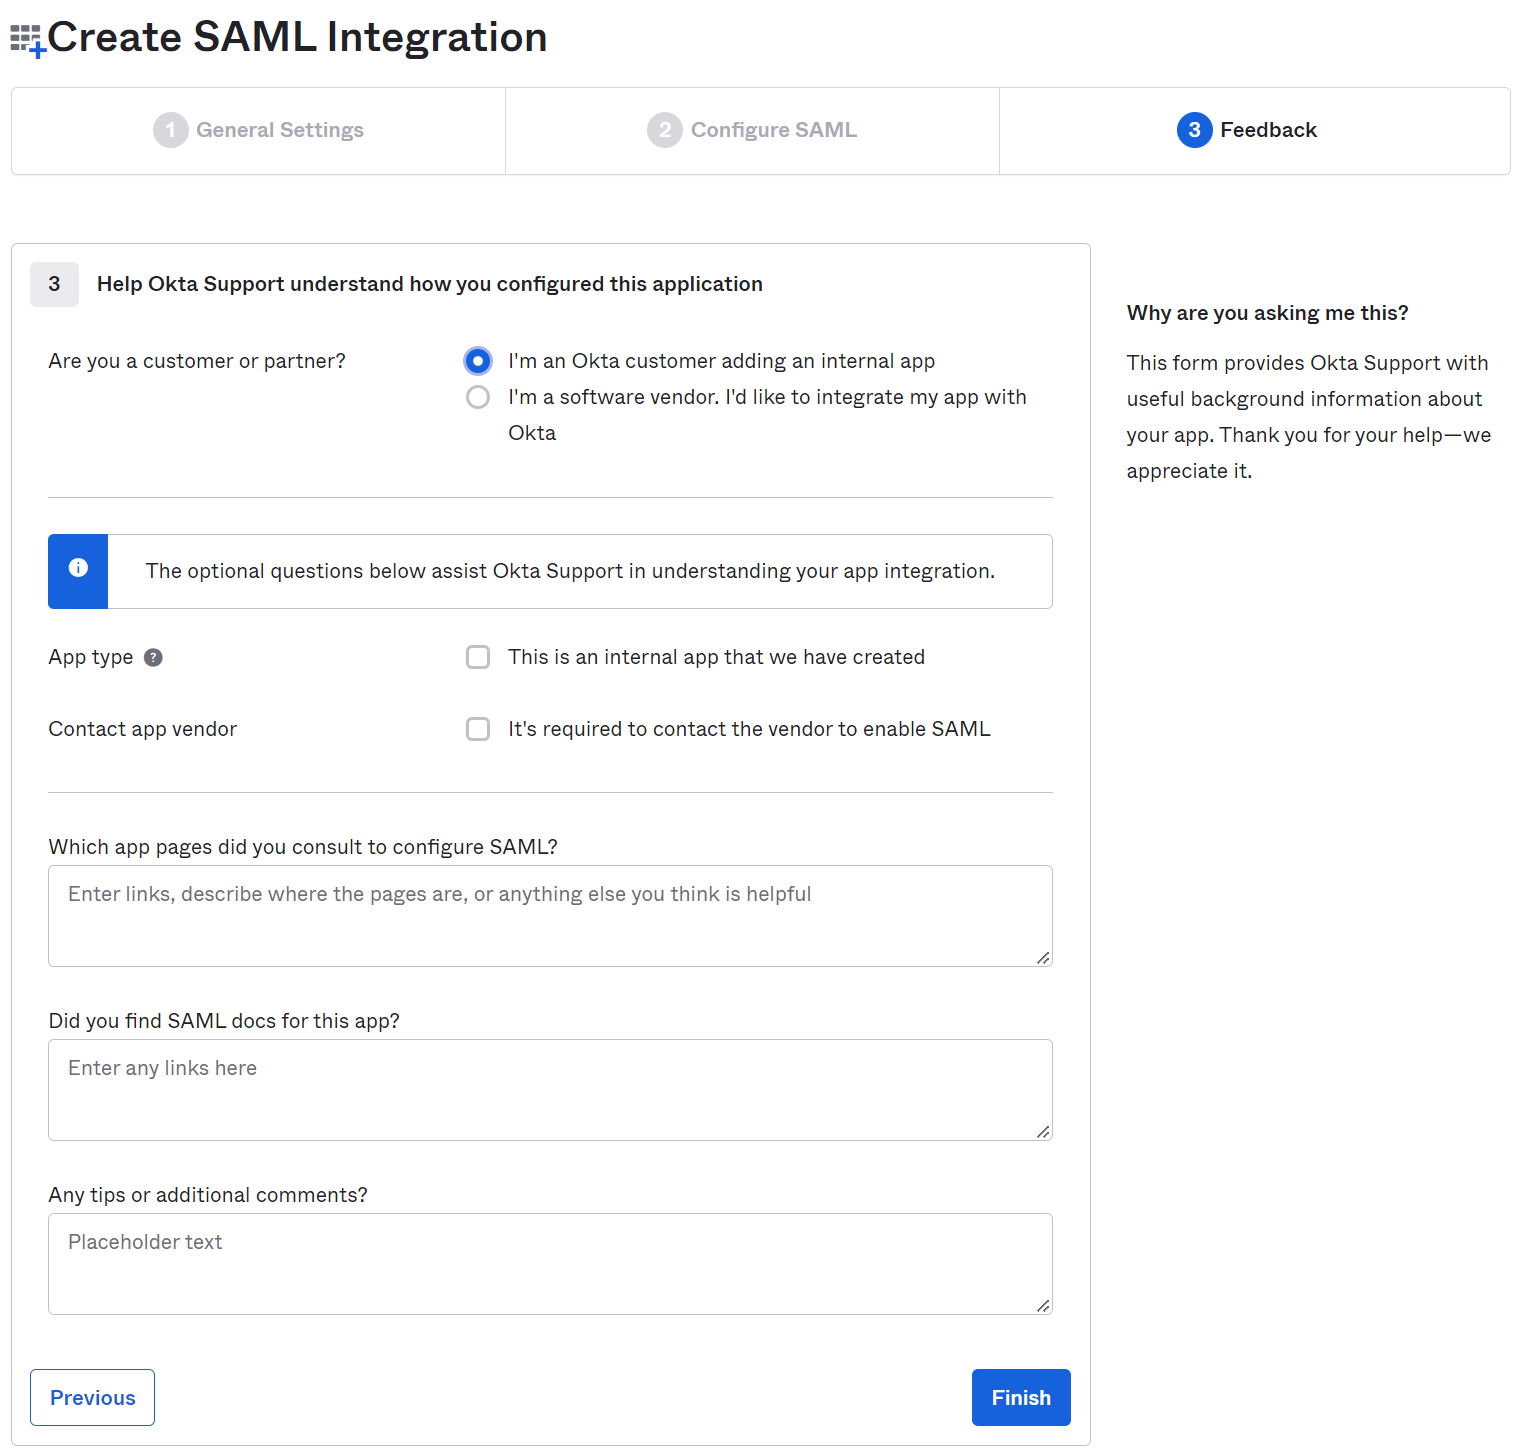
Pick *anything* for feedback
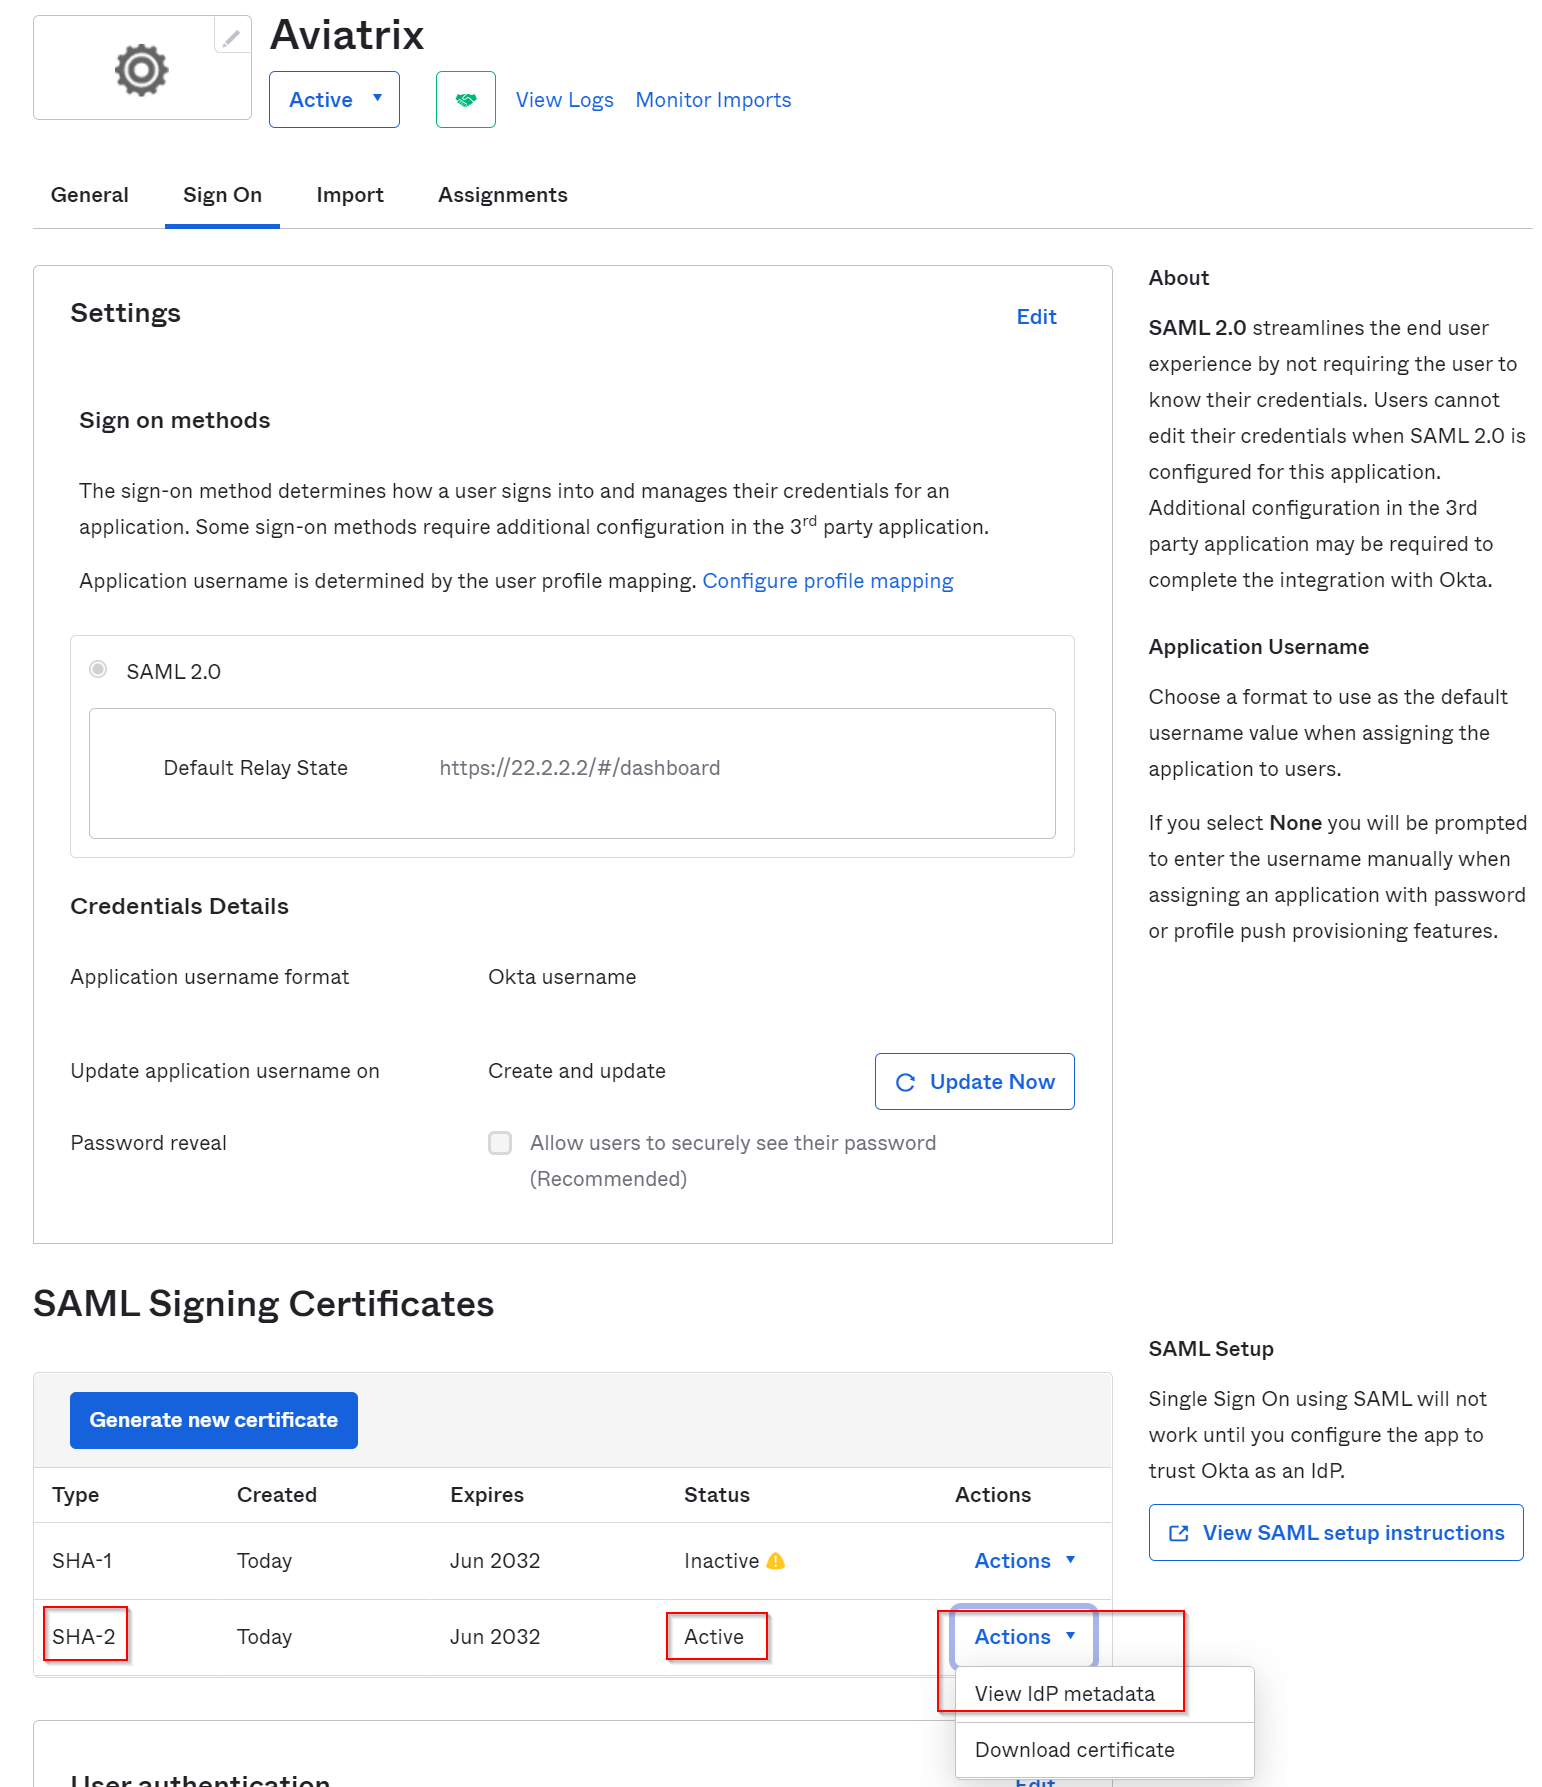
In the newly created Aviatrix App Integration, scroll down to bottom, notice SHA-V2 is Active, click on it’s right side Actions drop down -> View IdP metadata
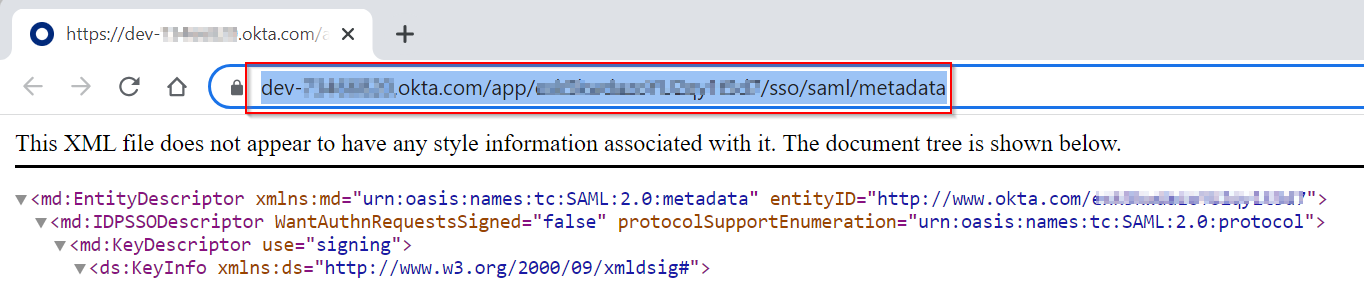
In newly opened browser window, copy the link, it would have following format. Save this link for next step.
https://dev-<accountid>.okta.com/app/<idstring>/sso/saml/metadata
Copy
Aviatrix Controller Configuration
Log into Aviatrix controller, eg: https:/22.2.2.2, you will be greeted with login for local account
After login, check user profile, shows as User: admin, which means you are using a local Aviatrix controller account logged in.

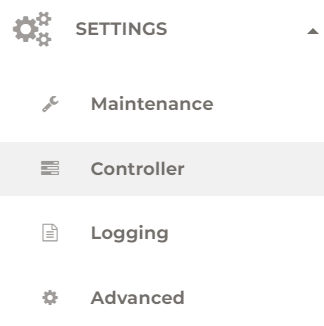
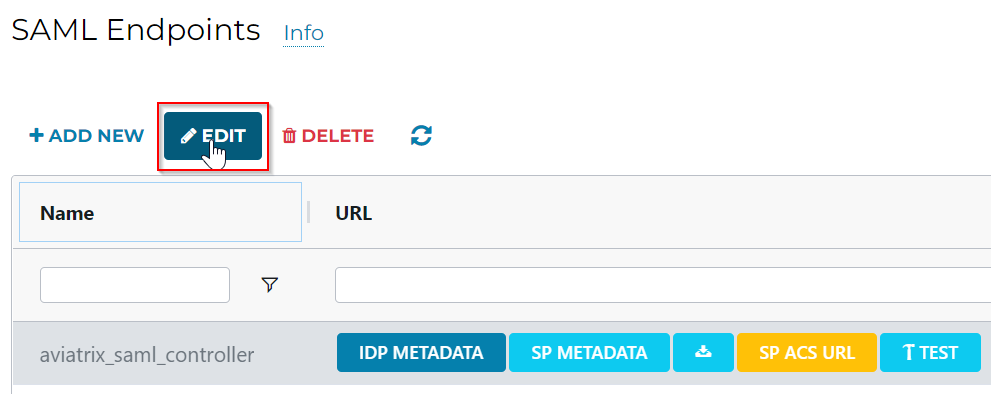
Settings -> Controller -> SAML Login -> Add new
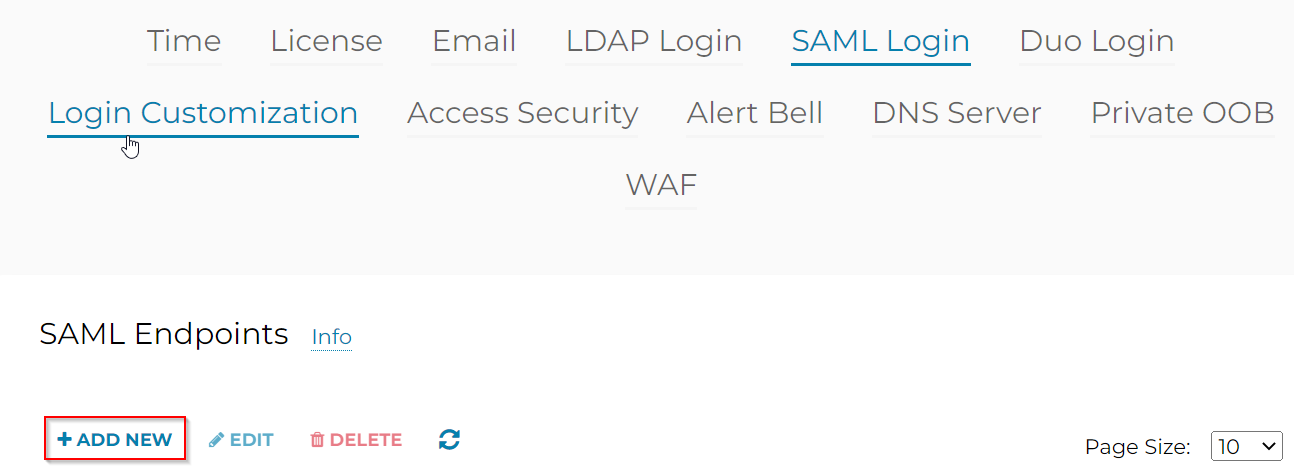
| Endpoint Name | aviatrix_saml_controller | Note: as we used earlier in Okta |
| IDP Metadata Type | URL | |
| IDP Metadata URL | https://dev-<accountid>.okta.com/ app/<idstring>/sso/saml/metadata |
Note: As recorded earlier |
| Entity ID | Hostname | |
| Access set by | Controller | |
| RBAC Groups | admin | Note: Permission assigned to this endpoint |

Once the SAML Endpoints have been created, click on Test button

You will be greeted by this. As I did already login to Okta as my gmail account, however, I didn’t assign my gmail to Aviatrix application in Okta
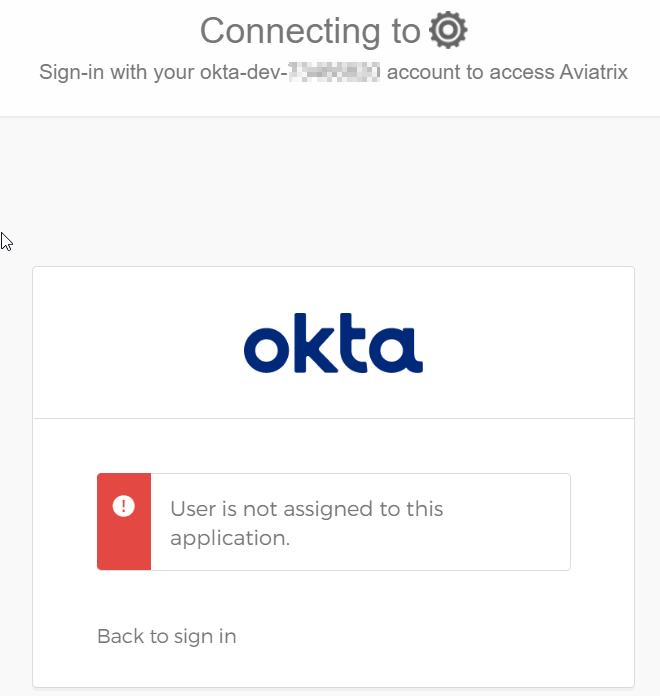
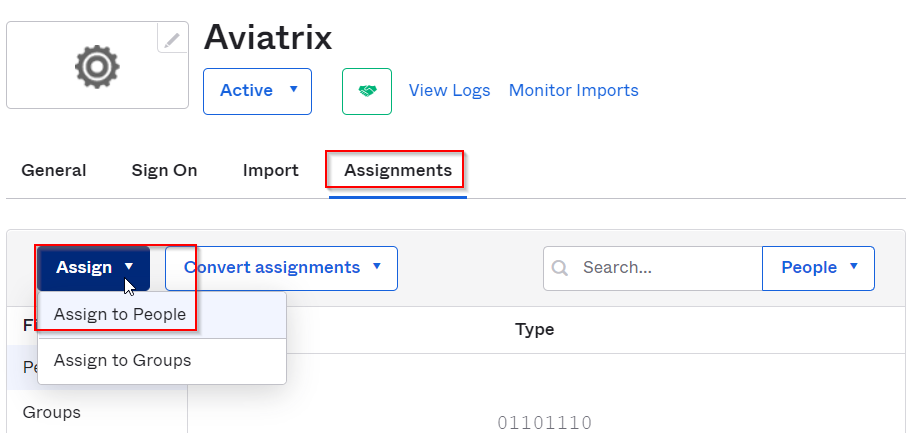
Switch back to Okta -> Aviatrix application -> Assignments -> Assign -> Assign to People -> Selected my google account.
Goes back to Aviatrix SAML Endpoints page, and run Test again. The screen gets redirected, and you may see your email flash by
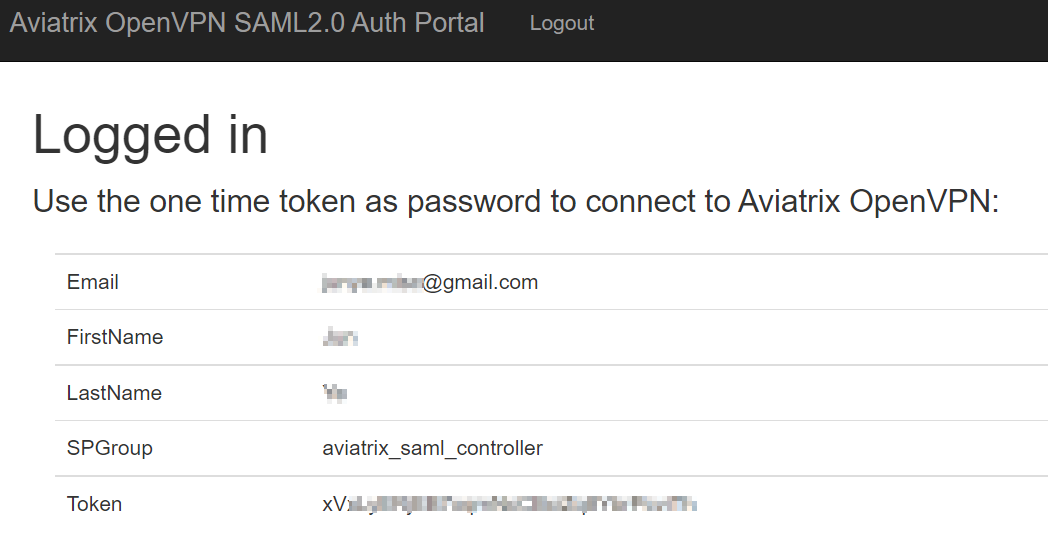
You can see your login indicates admin:<email> , which means SAML is working.
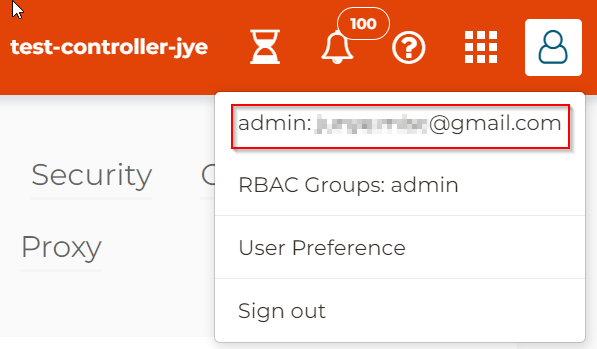
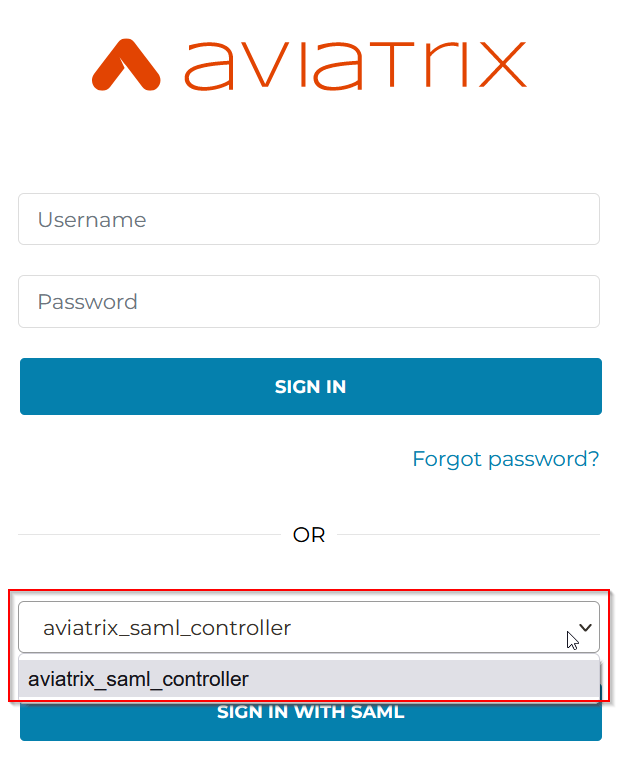
If you choose Sign out, it will return to login screen, notice that in the bottom, it listed the endpoint name: aviatrix_saml_controller we created earlier. Below it have a button to Sign in as SAML using this endpoint.
While this is working, since each endpoint is now mapping to a permission group defined in the Aviatrix controller, this would means for each permission group we have to create it’s own endpoint. People have to select a permission group from the drop down box before entering their login information, not very convenient.
Let’s take a look how we can utilize SAML IDP attribute to make this experience easier for end users.
Use SAML IDP attribute
Summary:
- Modify Aviatrix Controller SAML Endpoints to use SAML IDP attribute
- Create permission group, eg AWS_UsefulTools, assign it with permissions and access accounts
- In Okta, add additional directory attribute (eg aviatrixPermissionGroup) for user profile, so it can be used to match Aviatrix permission group
- In Okta, add this additional attribute (eg aviatrixPermissionGroup) to Aviatrix App SAML integration
- In Okta, add user profile with this additional directory attribute. (eg aviatrixPermissionGroup)
- Validation
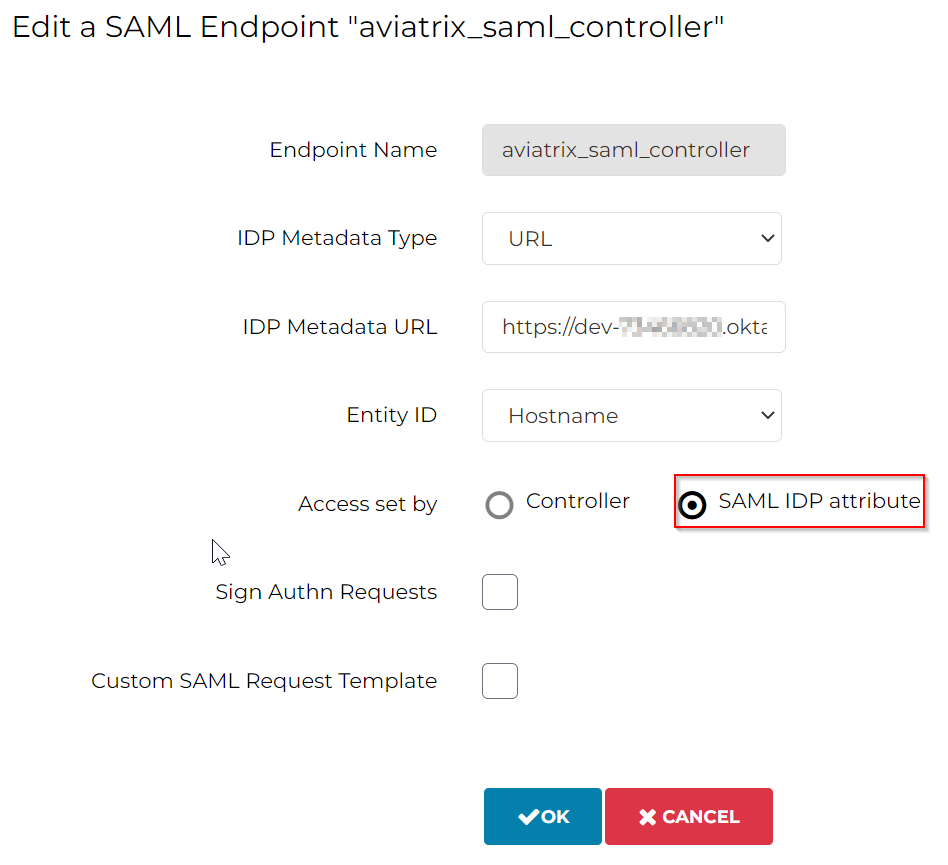
Modify Aviatrix Controller SAML Endpoints to use SAML IDP attribute
Settings -> Controller -> SAML Login -> Select the SAML endpoint aviatrix_saml_controller created earlier, then choose Edit
Switch Access set by from Controller to SAML IDP attribute, then click OK
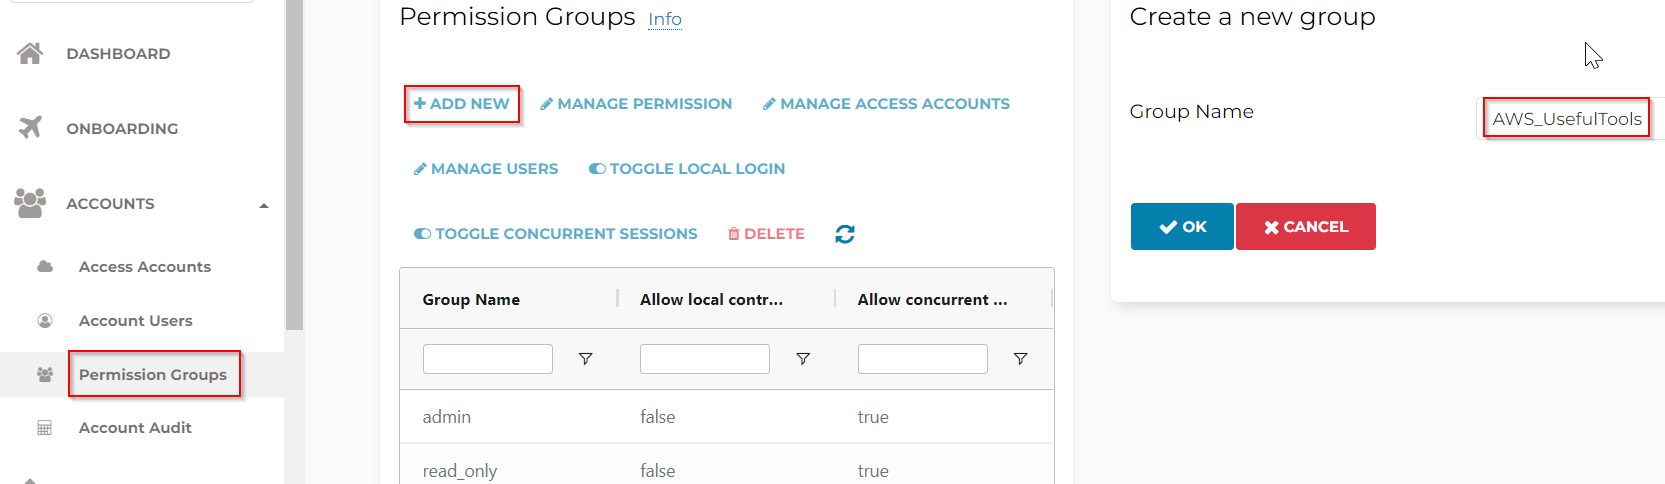
Create permission group, eg AWS_UsefulTools, assign it with permissions and access accounts
Let’s create a permission group: AWS_UsefulTools, let’s say this permission group will only have access to an AWS access account, and only have permission to Useful Tools section
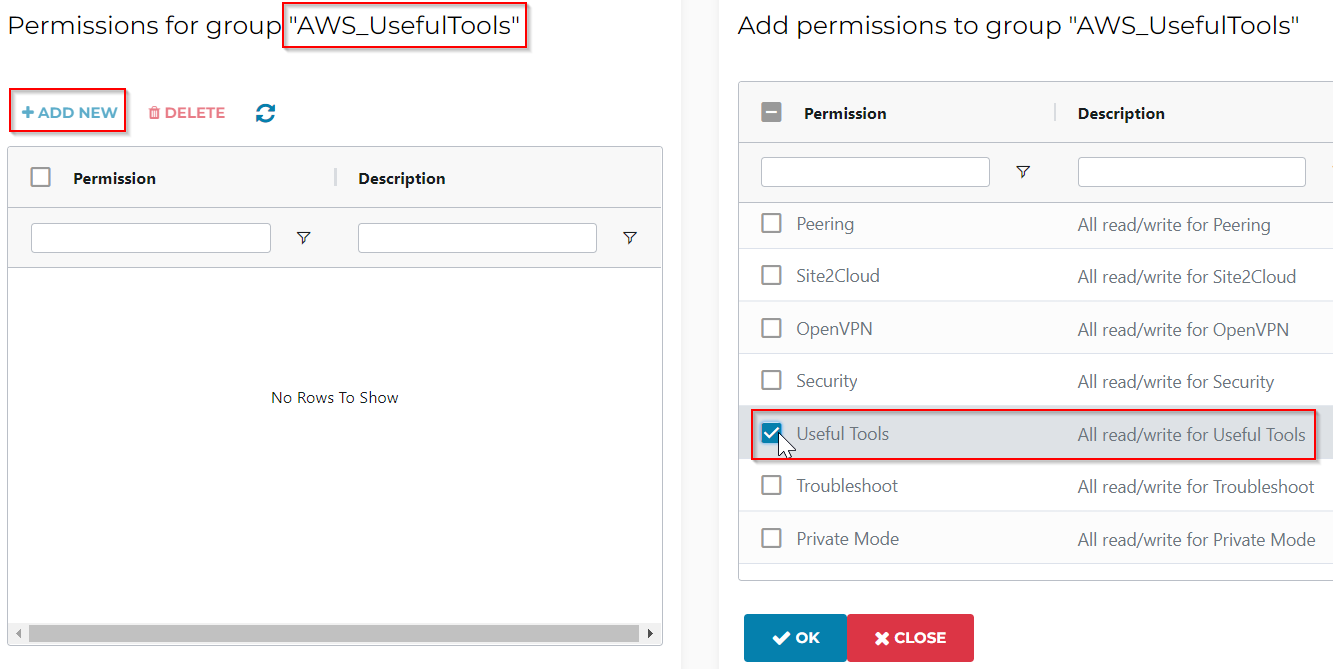
Select the newly created AWS_UsefulTools permission group, click on Manage Permission, check “Useful Tools“, then click OK
Select the newly created AWS_UsefulTools permission group, click on Manage Access Accounts, check the AWS account to grant access, then click OK
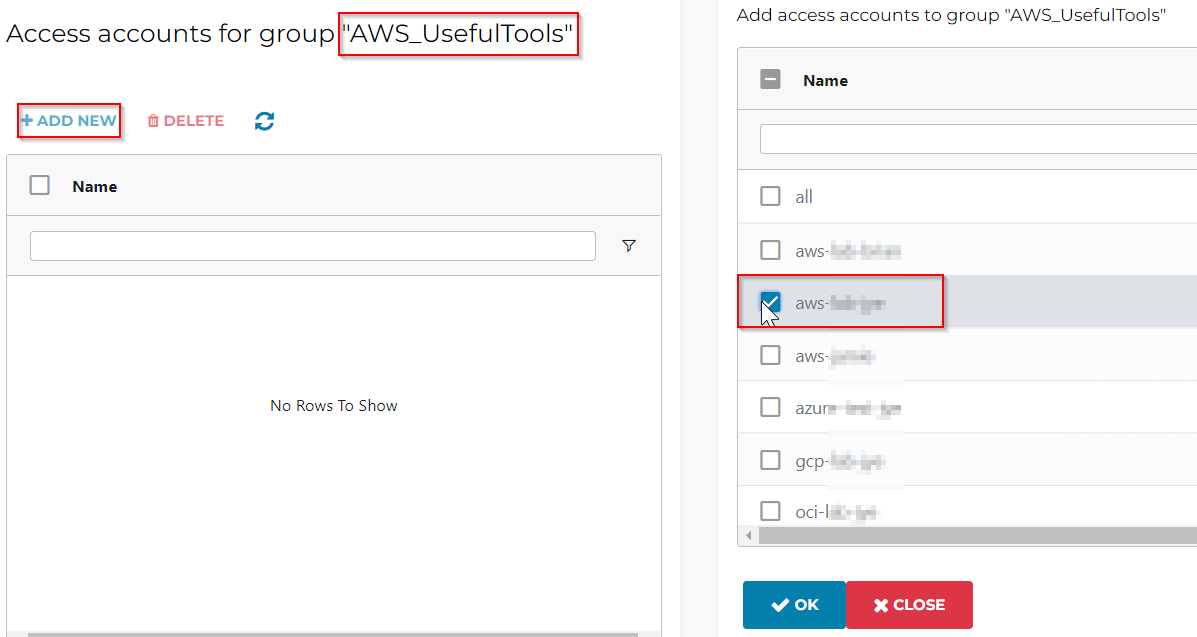
Now this AWS_UsefulTools permission group can only perform Useful Tools operation with selected AWS account.
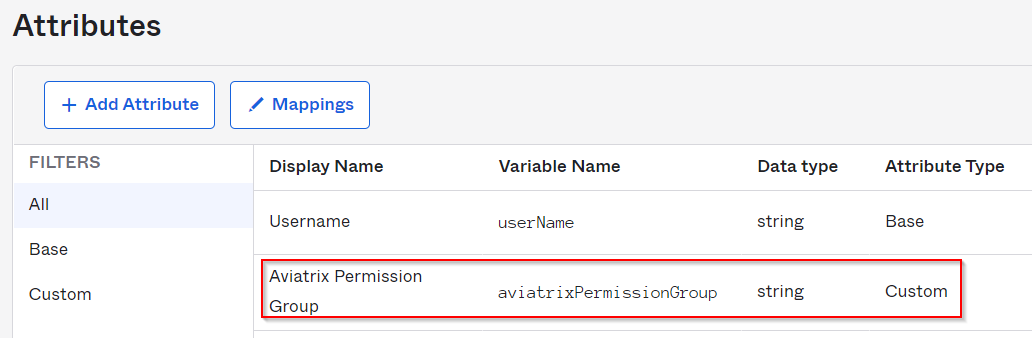
In Okta, add additional directory attribute (aviatrixPermissionGroup) for user profile, so it can be used to match Aviatrix permission group
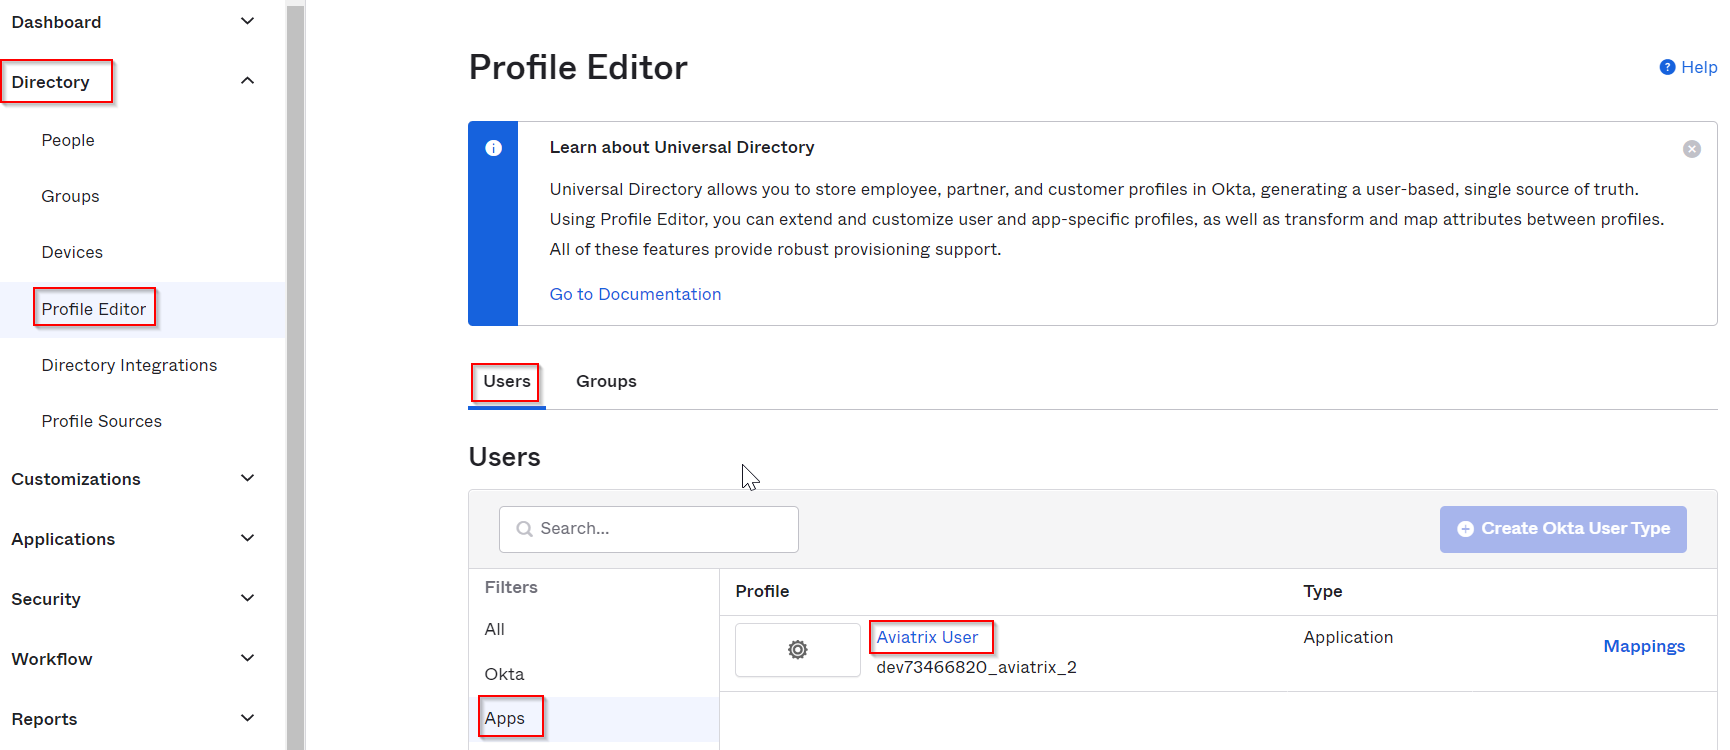
In Okta, we need to make sure each Okta user account using Aviatrix application would have a custom attribute, let’s call it aviatrixPermissionGroup
Okta -> Directory -> Profile Editor -> Users -> Apps -> Locate the Aiviatrix app created earlier, since it’s related to Users, click on it’s name Aviatrix User
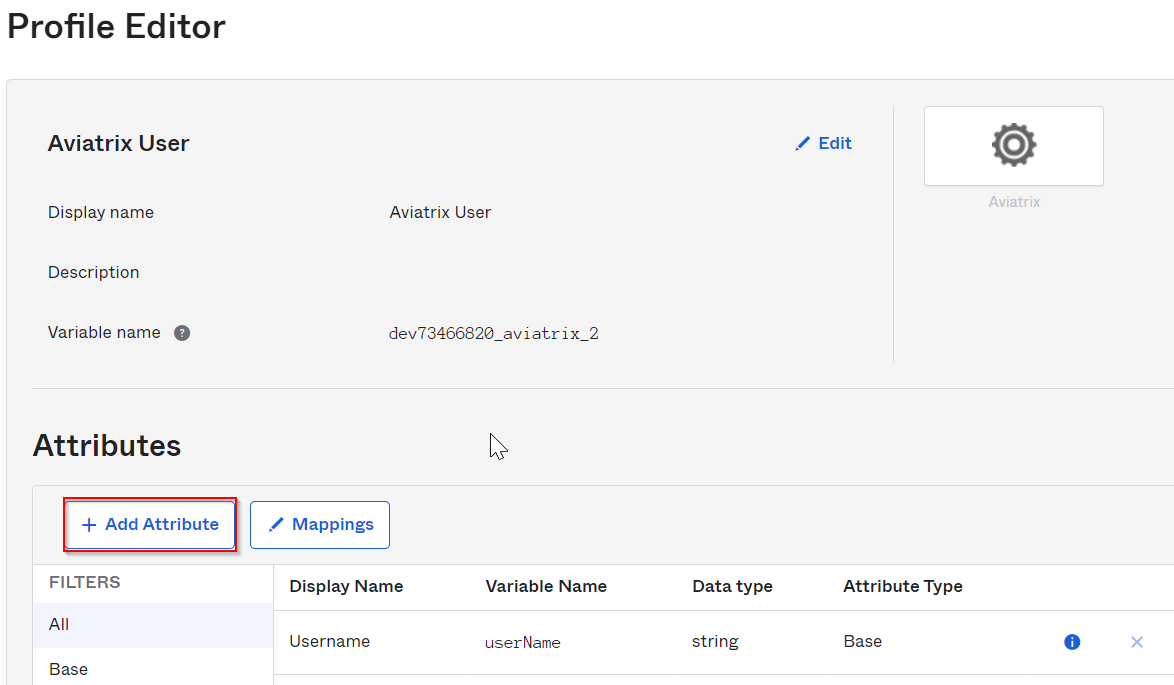
Click on Add attribute
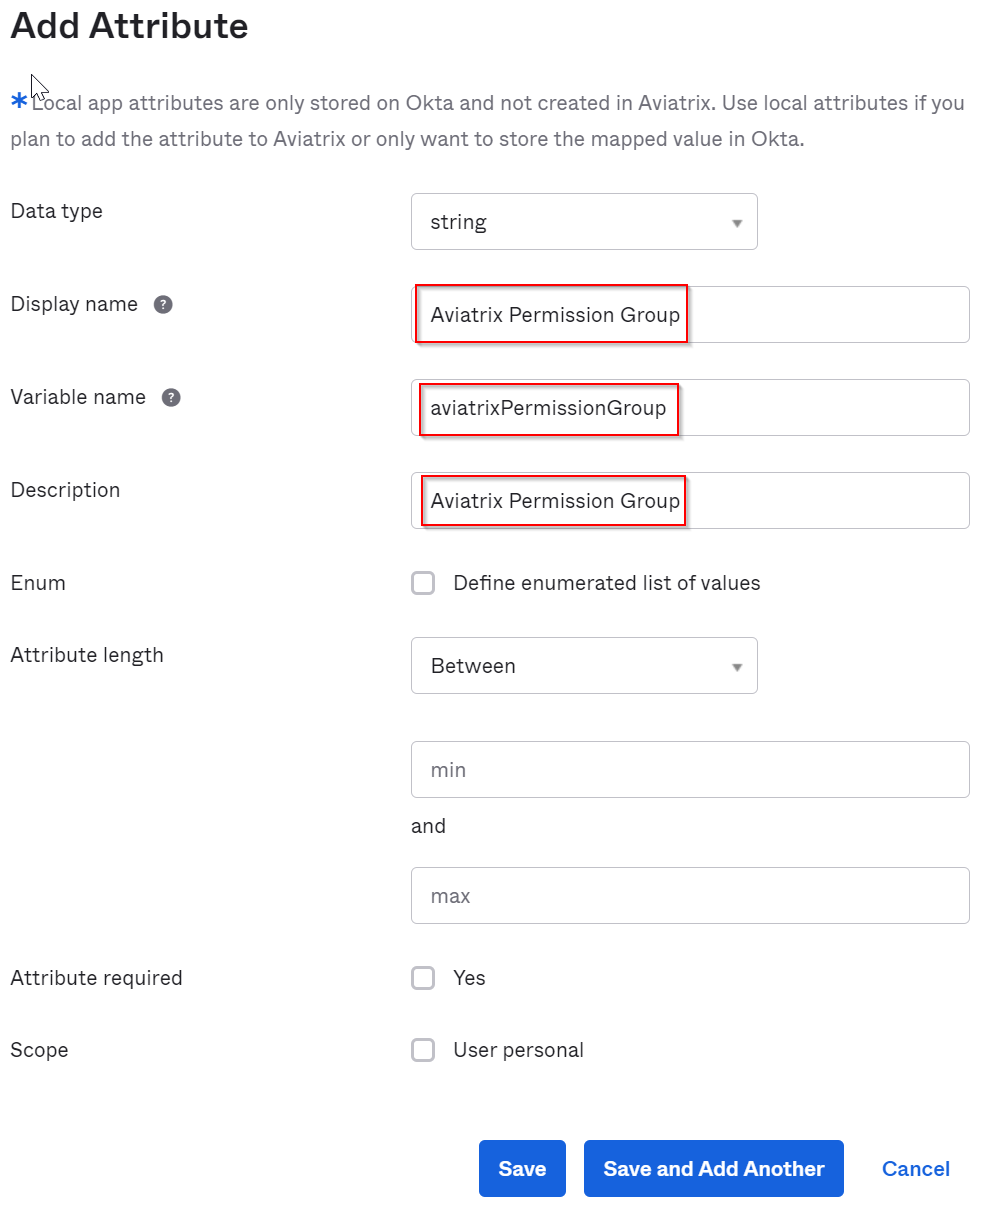
Leave data type as string, make sure variable name is aviatrixPermissionGroup, and fill in corresponding Display name and Description
Now we have additional custom attribute aviatrixPermissionGroup created for each Okta users using Aviatrix application
In Okta, add this additional attribute (aviatrixPermissionGroup) to Aviatrix App SAML integration
Next we need to make sure Aviatrix application pass this custom attribute
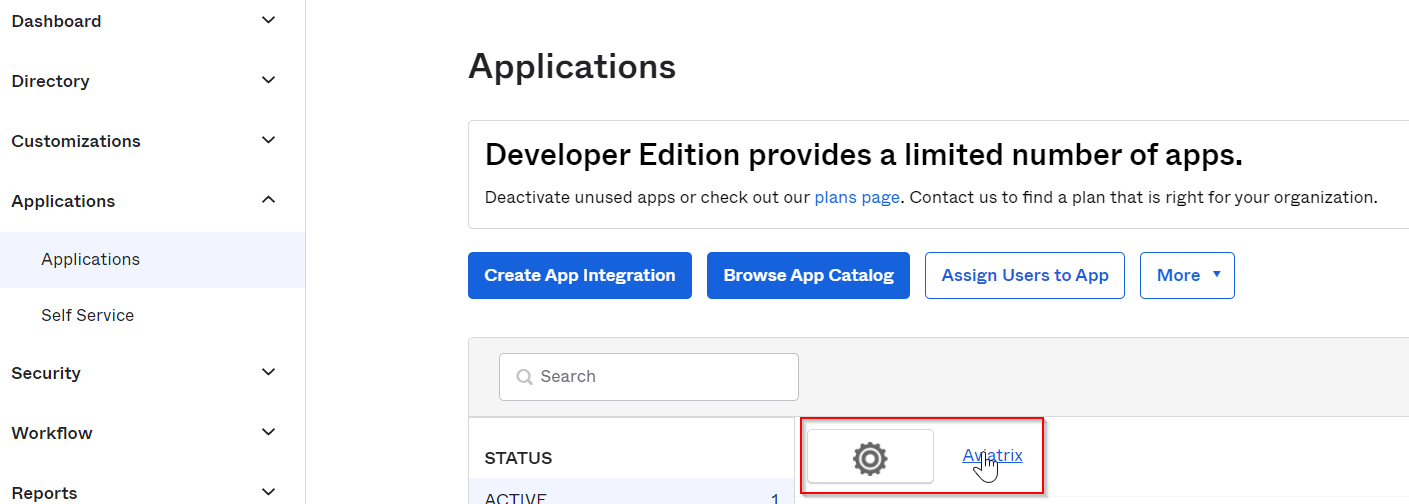
Okta -> Applications -> Applications -> Find and click on Aviatrix application
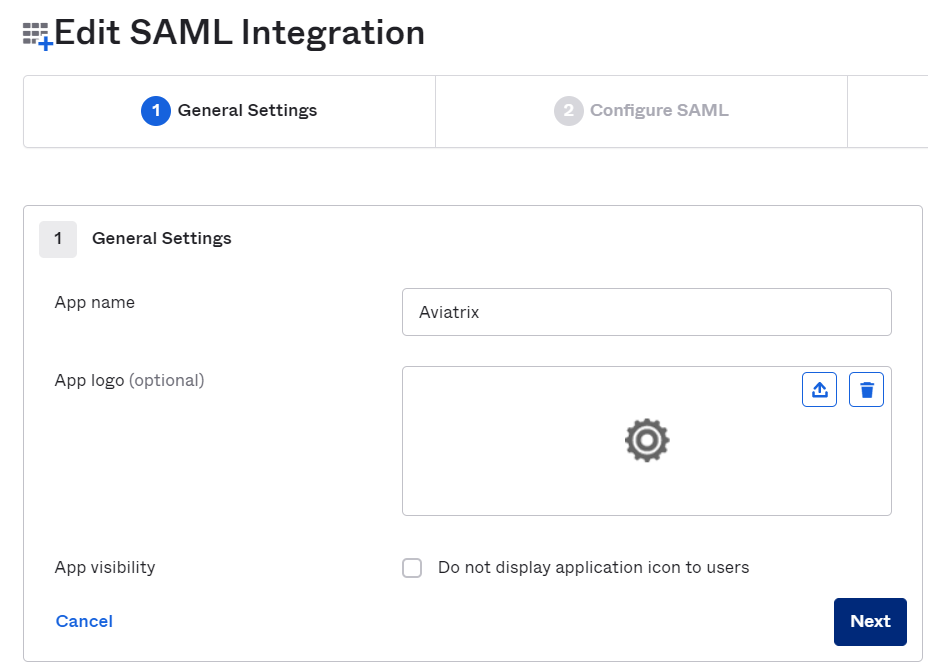
General tab -> SAML Settings -> Edit -> 1 General Settings -> Next
2 Configure SAML -> Attribute Statements (optional), previously we have:
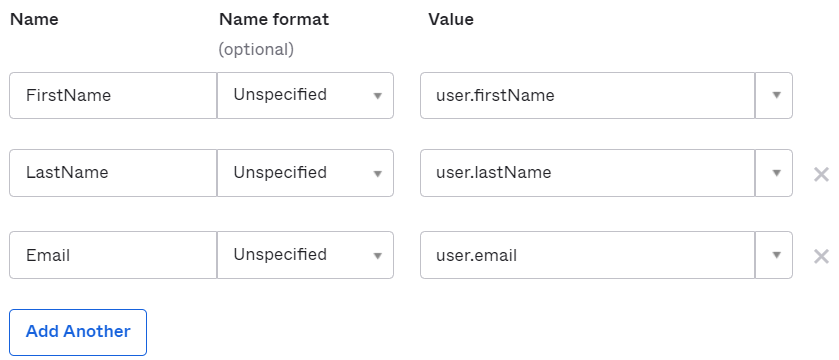
Click Add Another
| Name | Name format | Value |
| Profile | Unspecified | appuser.aviatrixPermissionGroup |
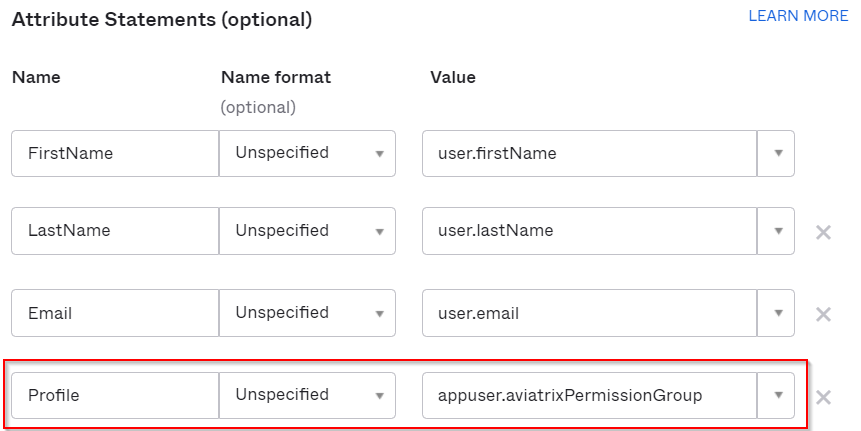
Remember to click Next and Finish to complete SAML Settings change
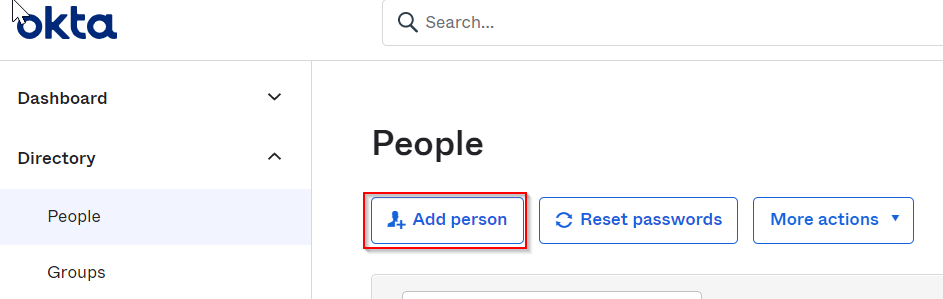
In Okta, add user profile with this additional directory attribute. (aviatrixPermissionGroup)
Now we have to add user, and make sure this custom attribute would
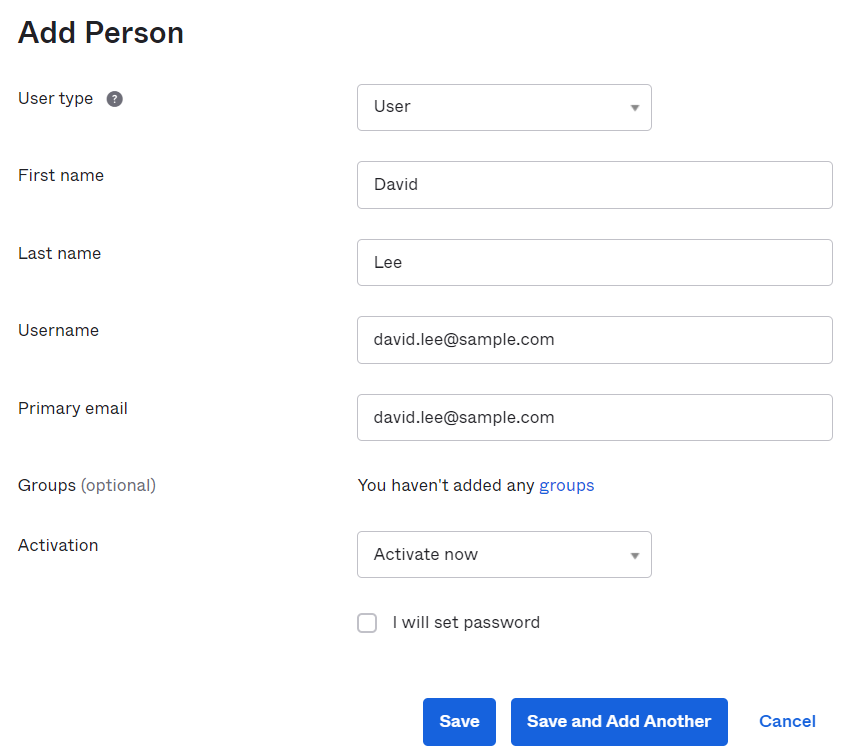
Okta -> Directory -> People -> Add person
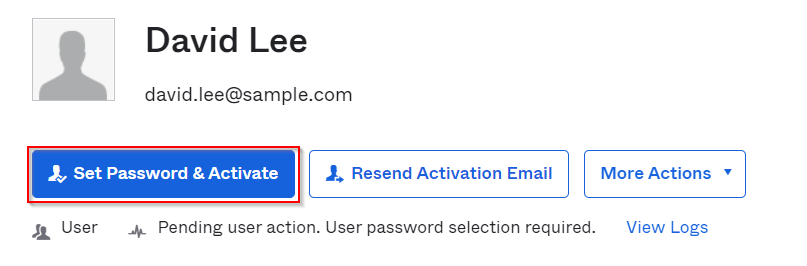
Then click on the user just created, it will be in pending status. Click on Set Password & Activate, a temporary password will be generated for next login
Applications -> Assigned Applications -> Assign Application
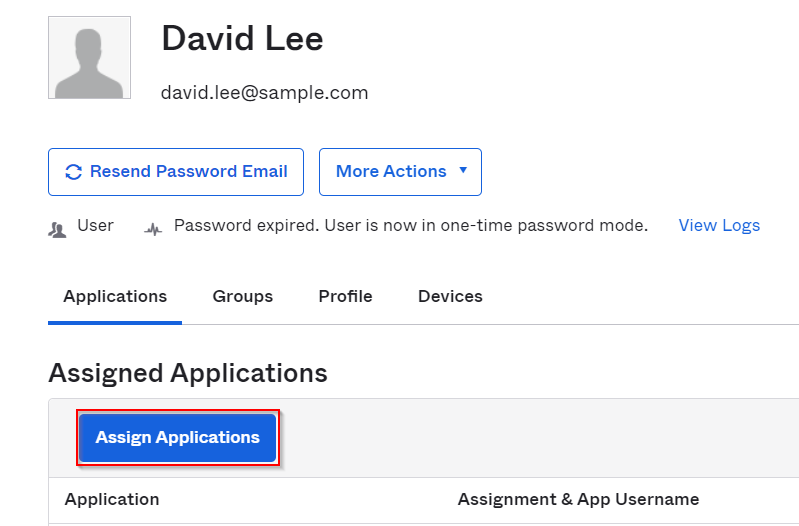
Assign Aviatrix application
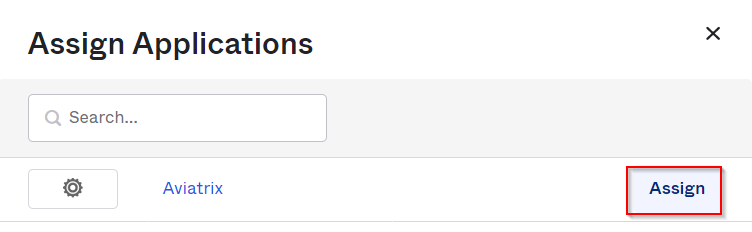
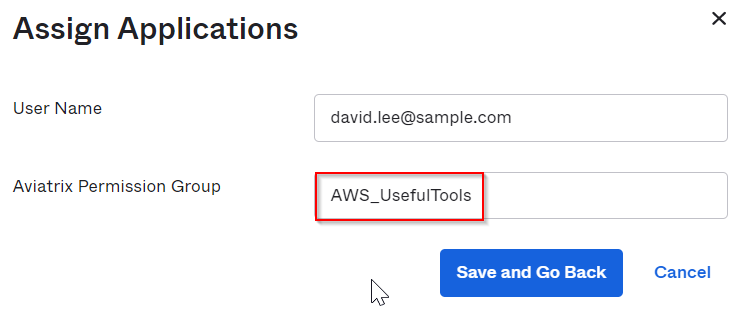
In the customized profile field “Aviatrix Permission Group”, add AWS_UsefulTools permission group we created earlier in Aviatrix permission group.
Validation
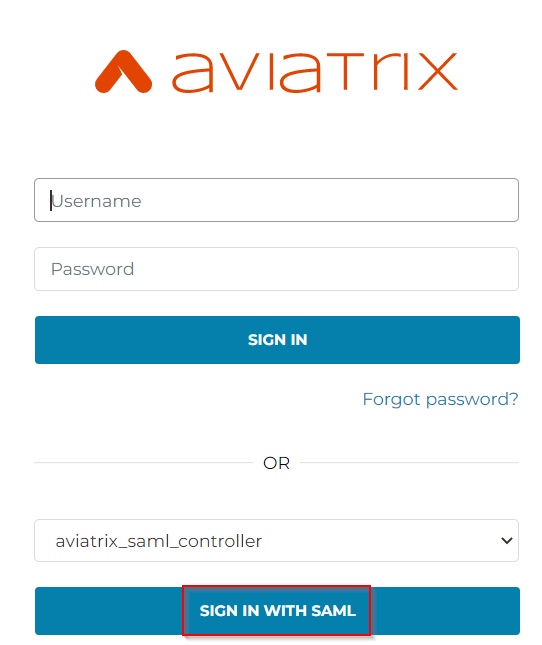
Login to Aviatrix Controller using incognito mode, click on Sign in with SAML
Login as the user account created earlier with temporary password, and reset password

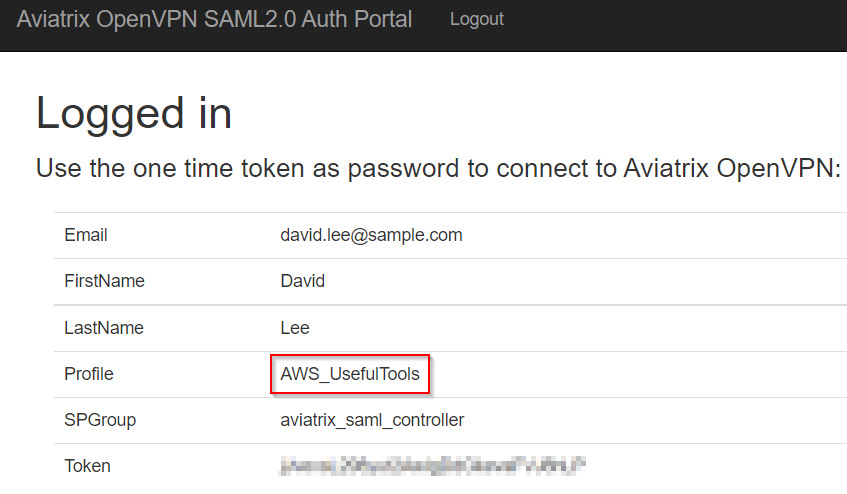
In the redirection screen, if you are fast enough, you can see Profile -> AWS_UsefulTools
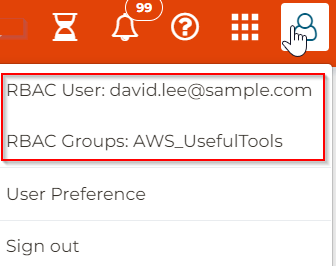
Once logged in to controller, on top right side, it shows logged as RBAC User and belong to RBAC Groups: AWS_UsefulTools.
You may now validate that this account will only be able to use Useful Tools for the AWS access account you granted in permission group. Example, when tried to create a VPC in an Azure access account, will get access denied.
